きっかけ
Google I/OのこれがConstraintLayoutでできているという噂を聞いて、これは!!と思ってConstraintLayuotを始めてみました。 この記事はConstraintLayoutを使って、ちょっとした画面は作ったことはある人向けです。
このアニメーションについて知りたい人は最後だけ読んで下さい。
それにより以下のようなアニメーションを簡単に作ることができました。
この記事はConstraintLayoutを使って、ちょっとした画面は作ったことはある人向けです。
このアニメーションについて知りたい人は最後だけ読んで下さい。
それにより以下のようなアニメーションを簡単に作ることができました。
 Google I/Oの動画とかで完璧に理解している人にはそんなに新しい知識はないかもです。。
サンプルアプリも用意しました。
https://github.com/takahirom/constraint-layout-samples
Google I/Oの動画とかで完璧に理解している人にはそんなに新しい知識はないかもです。。
サンプルアプリも用意しました。
https://github.com/takahirom/constraint-layout-samples

基礎的なところ
大きさの指定について、てきとうになってしまっていたのでメモしておきます。| 名前 | 説明 | |
|---|---|---|
 |
Fixed | 設定されている大きさ。width="16dp"など |
 |
Match Constraints | Constraintを満たす最大の大きさ。XMLファイルでは0dpがこれの意味で、width="0dp"となっていたらMatch Constraintだと思うといいと思います |
 |
Wrap Content | コンテンツの大きさに依存する。(画像サイズや文字数など) |
| Match Parent | ConstraintLayoutでは利用されるべきではない |
Bias
 ちなみにコードからも設定することができます。
基本的に
ちなみにコードからも設定することができます。
基本的にConstraintSetを使うことで、プロパティをいじることができます
val constraintSet = ConstraintSet()
constraintSet.clone(constraintLayout)
val bias = 0.5F
constraintSet.setVerticalBias(R.id.button, bias)
constraintSet.applyTo(constraintLayout)

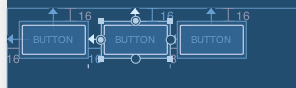
Chain
他のViewと同じ大きさなど大きさを整えるような形でのレイアウトが出来ます。 例えば均等配置とか、LinearLayoutのweight=1みたいなのが楽にできます。 また間にあるViewが消えたときもちゃんとLinearLayoutのような動きをするようです。 均等配置 (ちなみにChain Styleというものがあり、CHAIN_SPREAD -> CHAIN_SPREAD_INSIDE -> CHAIN_PACKEDの順番で動きます。見ればわかると思います。) xml上では以下のようになっていて指定されているのがわかると思います。
app:layout_constraintHorizontal_chainStyle="spread_inside"
 以下のようにweightを指定することも出来るので、比率での指定も可能となります。
app:layout_constraintHorizontal_weight="1"
GuideLine
 %で指定するのは現状UIで指定できないようで、
xmlを開いて以下のようになっているところを
%で指定するのは現状UIで指定できないようで、
xmlを開いて以下のようになっているところを
app:layout_constraintGuide_begin="20dp"
以下のようにapp:layout_constraintGuide_percentを使うように修正することがで利用することができます。割合は0〜1で指定します。
app:layout_constraintGuide_percent="0.5"
ConstraintLayoutはViewがgoneのときの挙動もサポートしている
 その時にGONEになったViewを参照していたViewでgoneになったときのマージンの大きさを設定することができます。地味にうれしいですね。
app:layout_goneMarginLeft="200dp"
1.1.0 Beta-1
新しく追加された機能について紹介していきます。
Barrier
なぜ使うか?
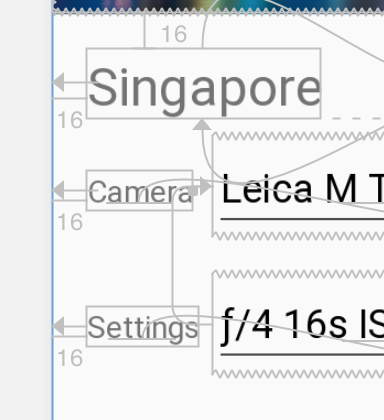
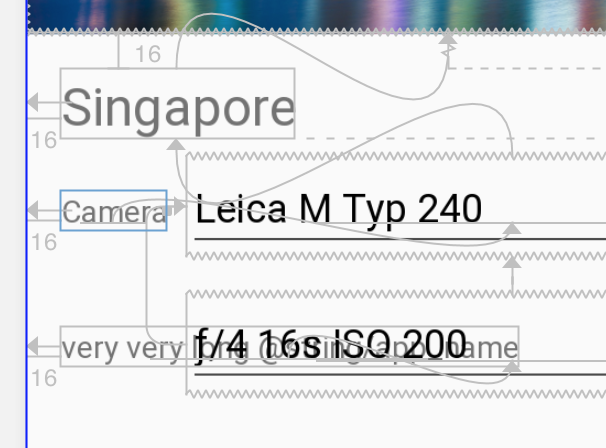
以下のようなレイアウトの時に"Settings"という文字列がめっちゃ長くなる可能性がある時、どうやって実装しますか??
| 通常時 | 長くなった時 |
|---|---|
 |
 |
使い方
こういうときCameraとSettingsのTextViewをレイアウトで囲むのではなくBarrierを使います。 右クリックからHelpers -> Add Vertical barrierで追加できます。(どうでもいいんですが、BarrierのBが大文字と小文字で違いますね) そしてBarrierの下に避けさせたいものを持ってきます。仮想的にレイアウトを作っちゃうイメージです。
 Barrierを作る場所を指定します。CameraとSettingsのTextViewの右側なのでrightまたはendを指定します。
 最後に右のEditTextからのConstraintを消して、BarrierにつけてあげればOK。
 これで伸びても大丈夫になりました!!

Group
なぜ使うか?
例えば固定のヘッダーがあったとして、それがいくつものViewで構成されているとき、表示非表示を一気に切り替えるようなときに使います。 (コードをなんとなく見たのですが、今のところvisibilityとelevationのみしか変更できないようです。)使い方
まずConstraintLayoutで右クリックしてAdd Groupします Groupの中にViewを入れます。
 後はgroupにidをつけられるので、以下のような形でコードから変えることで一気に関連付けられているViewの可視性を変更できます。
findViewById<Group>(R.id.group).visibility = View.GONE
PlaceHolder
PlaceHolderは用意しておくことで、簡単にウィジェットの内容を置き換えることができます。
たったこれだけ。最初はなぜこんな動きができるのか意味不明でした。
val onClickListener: (View) -> Unit = { view ->
     TransitionManager.beginDelayedTransition(root as ViewGroup)
     placeholder.setContentId(view.id)
}
imageA.setOnClickListener(onClickListener)
imageB.setOnClickListener(onClickListener)
imageC.setOnClickListener(onClickListener)
imageD.setOnClickListener(onClickListener)
使い方
 そしてxmlでPlaceHolderを置いてから、UI上で大きさなどの制約をつけます(現状、AndroidStudioのUI上で設置できない?)
ここでapp:content="@+id/image_d"のように指定することで、PlaceHolderの方にViewがもってこられるような形になります。
そしてxmlでPlaceHolderを置いてから、UI上で大きさなどの制約をつけます(現状、AndroidStudioのUI上で設置できない?)
ここでapp:content="@+id/image_d"のように指定することで、PlaceHolderの方にViewがもってこられるような形になります。
        <android.support.constraint.Placeholder
            android:id="@+id/placeholder"
            ...
            app:content="@+id/image_d"
            ...  />
 これで以下のようなコードだけで実行できます。
なぜこれでできるかというと、contentIdを指定することでViewの入れ替わりが発生して、またChainを利用していることで、Viewが消えた時にちゃんと他のViewで保管して入れてくれるためです。
そしてTransitionManager.beginDelayedTransitionを使うことでアニメーションしています。Transitionについてはこちらで前に説明しましたのでよろしければ、、
これで以下のようなコードだけで実行できます。
なぜこれでできるかというと、contentIdを指定することでViewの入れ替わりが発生して、またChainを利用していることで、Viewが消えた時にちゃんと他のViewで保管して入れてくれるためです。
そしてTransitionManager.beginDelayedTransitionを使うことでアニメーションしています。Transitionについてはこちらで前に説明しましたのでよろしければ、、
val onClickListener: (View) -> Unit = { view ->
     TransitionManager.beginDelayedTransition(placeHolderBinding.root as ViewGroup)
     placeholder.setContentId(view.id)
}
imageA.setOnClickListener(onClickListener)
imageB.setOnClickListener(onClickListener)
imageC.setOnClickListener(onClickListener)
imageD.setOnClickListener(onClickListener)
Percent Dimension
以下で%(割合)で大きさを指定できます。(現状、AndroidStudioのUI上で設置できない?)
PercentRelativeLayoutの置き換えが快適になりそうです。
android:layout_width="0dp"
app:layout_constraintWidth_default="percent"
app:layout_constraintWidth_percent="0.5"
Google I/Oのアニメーションについて
コードはここにあります。
https://github.com/google/iosched/blob/master/lib/src/main/java/com/google/samples/apps/iosched/feed/FeedViewHolder.java#L51
すごく簡単に書くと以下のような形です。
    private final ConstraintSet expandedConstraints = new ConstraintSet();
    private ConstraintLayout mainLayout;


// 前もってやっておく レイアウトのConstraintSetの内容をcloneする。
expandedConstraints.clone(mainLayout.getContext(), R.layout.feed_message_card_expanded);

// アニメーション + レイアウト変更
TransitionManager.beginDelayedTransition(parent);
expandedConstraints.applyTo(mainLayout);
constraints.clone(context, R.layout.expanded);で既存のレイアウトから制約だけ取ってきて、それをconstrains.applyTo(constraintLayout)で反映させるということを行っています。
本当はTransitionの動きをCustom Transitionを作ってカスタマイズして、画像と文字が重ならないようにしたりなどを行っていますが、Transitionの話になってしまうので、ここでは省略します。
最初の方に出していたサンプルのアプリのコードは以下になります。ConstraintLayoutを使うことで簡単にアニメーションを実装することができます。
https://github.com/takahirom/constraint-layout-samples/blob/master/app/src/main/java/com/github/takahirom/constraint_layout_samples/AnimationActivity.kt
ConstraintLayoutの拡張性
BarrierやGroupはConstraintHelperクラスを継承して実現されています。
Viewのライフサイクルのタイミングなどで、
指定されたViewの操作が出来きます
カスタムしたのを簡単に作ってみました。ちなみに勝手に作ることも公式にサポートされています。ちゃんとした使い方はちゃんとしたドキュメントが出てからになると思います。
 レイアウトでの指定
    <com.github.takahirom.constraint_layout_samples.Blink
        android:layout_width="wrap_content"
        android:layout_height="wrap_content"
        app:constraint_referenced_ids="textView,imageView" />
ConstraintHelperを継承したBlinkクラス
class Blink : ConstraintHelper {
    constructor(context: Context) : super(context)
    constructor(context: Context, attrs: AttributeSet) : super(context, attrs)
    constructor(context: Context, attrs: AttributeSet, defStyleAttr: Int) : super(context, attrs, defStyleAttr)

    override fun updatePreLayout(container: ConstraintLayout) {
        super.updatePreLayout(container)

        for (i in 0 until this.mCount) {
            val id = this.mIds[i]
            val view = container.getViewById(id)
            if (view != null) {
                ObjectAnimator.ofFloat(view, "alpha", 1F, 0F).apply {
                    repeatCount = ValueAnimator.INFINITE
                    repeatMode = ValueAnimator.REVERSE
                }.start()
            }
        }
    }
}
まとめ
- いろんなレイアウトの機能が入っていて、 結構いろんなパターンに適応できそう
- ある程度拡張できるように作ってある
- ConstraintLayout 1.1が待ち遠しい
- アニメーションを簡単にできる
参考資料
https://codelabs.developers.google.com/codelabs/constraint-layout/index.html
https://androidstudio.googleblog.com/2017/05/constraintlayout-110-beta-1-release.html
https://medium.com/google-developers/building-interfaces-with-constraintlayout-3958fa38a9f7
https://blog.stylingandroid.com/constraintlayout-chains-spread-chains/
https://www.youtube.com/watch?v=nYb4FUdlLZE
https://academy.realm.io/posts/360-andev-2017-nicolas-roard-advanced-constraintlayout/
https://github.com/googlesamples/android-ConstraintLayoutExamples
https://constraintlayout.com/