1. Cloud Functions ってなに?
Cloud Functions では、クラウド環境でイベントが発生したときに実行される Node.js を書くことができ、巷では﹁サーバレスアーキテクチャ﹂とか呼ばれているそうです。よく AWS Labmda に対抗するサービスという記事を見かけますが、正直 AWS 触ったことがないので知りませんw Cloud Functions はフルマネージドで提供され、利用者はサーバーまたは実行環境を管理する必要がありません。現在はアルファ版で限定公開されており、次の3つのイベントトリガーで Node.js で書いたファンクションを実行することができます。 ●Cloud Pub/Sub topic ●Cloud Storage bucket = Object Change Notification ●HTTP trigger (HTTP POST only) 少し前まで Cloud Functions を作成すると Google Container Engine︵以下GKE︶に cluster が自動的に作られて、実行環境としてインスタンスが立ち上がっていました。マシンスペックもけっこういい感じのモノだったので、﹁コレ課金されるのかよ!﹂と思いながら、ファンクション作っては削除していたので、毎回めんどいなぁと感じていました... その後のアップデート︵5/4 実施︶でマネージド サービスに移行したため、今現在は自分のプロジェクトに cluster が作られることはありません。無課金で利用させていただいております m(__)m2. Cloud Functions を使うための準備
Cloud Functions はまだアルファ版のため、アルファテストに参加する必要があります。以下のフォームから申し込みをします。 Google Cloud Functions - Alpha Sign Up そうして忘れたころに Google から﹁あなたのアカウントをホワイトリストに登録したよ!﹂というメールが届くので API Manager から Cloud Functions API を有効︵Enable︶にします。
 以上で Cloud Functions を使うための準備は完了です。
3. 課金データのエクスポートを設定する
今回は GCP の課金データを BigQuery に入れたいので、まずは Google Developer Console の Billing export 画面から課金データを Google Cloud Storage︵以下GCS︶に吐き出すように設定します。 これで毎日の課金データが GCS に出力されるようになります。

4. Function を作る
4.1. コードを書く
Cloud Functions は Node.js をベースにしたマネージドな JavaScript 実行環境になります。私は Node.js を触るのは初めてだったので、ハマることが多かったです{
"name": "bqbilling",
"version": "1.0.0",
"main": "bqbilling.js",
"dependencies": {
"gcloud": "^0.28.0",
"node-uuid": "^1.4.7",
"moment": "^2.10.6",
"moment-timezone": "^0.4.0"
}
}
次に GCS のバケットに出力された課金データを読み込んで BigQuery に投入するメインな処理を書きます。今回は GCS と BigQuery を利用するので、最初に次のように記述しておきます。keyFilename は特に指定しなくても API へのアクセスは許可されるようです。手間が省けますね。
var gcloud = require('gcloud')({
    projectId: '********'
});
var gcs = gcloud.storage() ;
var bq = gcloud.bigquery() ;
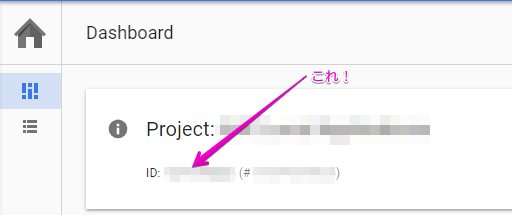
projectId の値は対象の GCP プロジェクトの ID を記述します。これは Google Developer Console の Home 画面のダッシュボードからコピペします。
Cloud Functions の Cloud Storage bucket トリガーで呼び出される部分は次のように実装しています。このトリガーは GCS が備える Object Chage Notification(OCN) と同じ機能になります。GCS にオブジェクトが 追加(アップロード)/更新(変更)/削除 された時に呼び出される(通知される)仕掛けになります。
exports.main = function(context, data){
    var bucket = gcs.bucket(data.bucket) ;
    var file = bucket.file(data.name) ;
    var buffer = new Buffer('') ;
    file.createReadStream()
        .on('data', function(chunk){
            buffer = Buffer.concat([buffer, chunk]) ;
        })
        .on('finish', function(){
            var jsonBilling = JSON.parse(buffer) ;
            execute(data.name, jsonBilling) ;
        });
    context.success() ;
};
前述した課金データは毎日 GCS の指定バケットに追加されるので、そのタイミングで上記の処理が実行されます。Function パラメータの data パラメータにトリガーに関連付けられたデータが格納されているので createReadStream で追加された課金データ(JSON)を読み込みます。
それでは BigQuery 側の処理をみていきましょう。BigQuery のテーブルは月単位(yyyyMM)で保持するようにしました。少しショボイですが、毎回テーブルが存在するかどうかチェックして、なければ作成するようにしています ![]()
function execute(fileName, jsonBilling){
    var fileDate = fileName.match(/\d{4}-(0[1-9]|1[0-2])/g) ;
    var tableName = fileDate.toString().replace(/-/g, '') ;

    var dataset = bq.dataset('{データセット名}') ;
    var targetTable = dataset.table(tableName) ;

    targetTable.exists(function(err, exists){
        if ( !exists ) {
            // TODO: テーブルがなければ新規に作る
            var options = {schema: {
                "fields": [
                    {
                        "type": "timestamp",
                        "mode": "required",
                        "name": "StartTime"
                    },
                    {
                        "type": "timestamp",
                        "mode": "required",
                        "name": "EndTime"
                    },
                    {
                        "type": "STRING",
                        "mode": "required",
                        "name": "ProjectId"
                    },
                    {
                        "type": "STRING",
                        "mode": "required",
                        "name": "Description"
                    },
                    {
                        "type": "FLOAT",
                        "mode": "nullable",
                        "name": "Debits"
                    },
                    {
                        "type": "STRING",
                        "mode": "required",
                        "name": "Currency"
                    },
                    {
                        "type": "FLOAT",
                        "mode": "nullable",
                        "name": "Amount"
                    },
                    {
                        "type": "STRING",
                        "mode": "nullable",
                        "name": "Unit"
                    },
                    {
                        "type": "STRING",
                        "mode": "required",
                        "name": "FileName"
                    }
                ]
            }};
            dataset.createTable(tableName, options, function(err, table, apiResponse){
                if ( err ) {
                    console.log('err: ', err) ;
                    console.log('apiResponse: ', apiResponse) ;
                    return ;
                }
                exportBigQuery(table, fileName, jsonBilling) ;
            });
        }
        else exportBigQuery(targetTable, fileName, jsonBilling) ;
    }) ;
}
最後に課金データ(JSON)を BigQuery に投入します。実装例を以下に示します。
どういうわけか Cloud Functions の Cloud Storage bucket トリガーでは同じ課金データ(JSON)が 2 回連続して通知されるので、重複して投入されないようにクエリーを投げてチェックするようにしています。
function exportBigQuery(table, fileName, jsonBilling){
    var query = util.format('SELECT COUNT(*) AS count FROM [%s] WHERE FileName = "%s"', table.metadata.id, fileName) ;
    bq.query(query, function(err, rows, nextQuery){
        if ( err ) {
            console.log('err: ', err) ;
            return ;
        }
        else if ( rows[0].count > 0 ) return ;

        for ( var i = 0; i < jsonBilling.length; i++ ) {
            var item = jsonBilling[i] ;

            var stime = moment(item.startTime).utc().format('YYYY-MM-DDTHH:mm:ssZ') ;
            var etime = moment(item.endTime).utc().format('YYYY-MM-DDTHH:mm:ssZ') ;

            var row = {
                insertId: uuid.v4(),
                json: {
                    StartTime: stime,
                    EndTime: etime,
                    ProjectId: item.projectId,
                    Description: item.description,
                    Debits: item.cost.amount,
                    Currency: item.cost.currency,
                    Amount: item.measurements[0].sum,
                    Unit: item.measurements[0].unit,
                    FileName: fileName
                }
            };
            var options = {
                raw: true,
                skipInvalidRows: true
            };
            table.insert(row, options, function(err, insertErrors, apiResponse){
                if ( err ) {
                    console.log('err: ', err) ;
                    console.log('apiResponse: ', apiResponse) ;
                }
            }) ;
        }
    });
}
4.2. デプロイする
それでは作成したコードをデプロイしてみましょう。Google Developer Console の Cloud Functions 画面で﹁CREATE FUNCTION﹂します。 今回は GCS のバケットに出力される課金データを扱うのでトリガーは﹁Cloud Storage bucket﹂を選択します。また、ソースコードは zip で固めてアップロードする格好になります。尚 ﹁package.json﹂も zip に一緒に含めてください 。
デプロイに成功すると、以下のように表示されます。
今回は GCS のバケットに出力される課金データを扱うのでトリガーは﹁Cloud Storage bucket﹂を選択します。また、ソースコードは zip で固めてアップロードする格好になります。尚 ﹁package.json﹂も zip に一緒に含めてください 。
デプロイに成功すると、以下のように表示されます。
 ここまでで仕込みはすべて完了です。あとは毎日、課金データ︵JSON︶が GCS に追加される度に自動的に BigQuery に投入されていきます
 5. BigQuery に投入された課金データ
BigQuery のテーブル スキーマは、課金データ︵JSON︶をベースに必要な項目のみに絞って以下のように定義しています。 また、課金データは以下のような感じで期待どおり格納されました
  一定の金額を超えたらアラートを通知させるなどの仕組みも作れそうですね。