軽快なLinux環境をつくれる、coLinuxのセットアップ手順
以前にWindows上でLinuxを走らせる方法として、VMwareで作る、初めてのLAMP環境構築 - UNIX的なアレを紹介しました。
今回もまた、Windows上でLinuxを動かせる、coLinuxというものを紹介します。
VMwarePlayerに比べたメリットは動作が早いという点です。
coLinuxのインストール手順を記載しているサイトはすでにありますが、若干経験者向けな内容になっていますので、ここでは出来るだけ噛み砕いて書いてみます。
それでもVMwarePlayerよりも設定が若干難しいですが、頑張っていきましょう!
必要なモノをダウンロードする。
まず、必要なものは以下の2つです。
coLinux本体ダウンロード
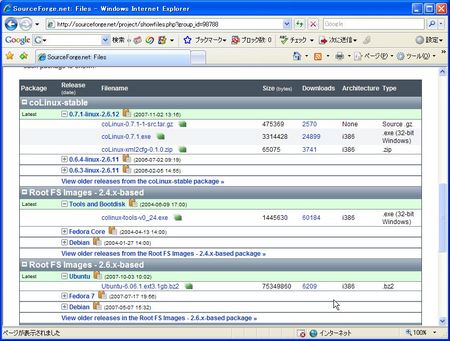
それではまずcoLinux本体をダウンロードします。
Cooperative Linux - Browse Files at SourceForge.net
coLinux-0.7.1.exeというファイルがありますのでこちらをダウンロード下さい。
FileSystemImageダウンロード

swapのイメージファイルのダウンロード
http://gniarf.nerim.net/colinux/swap/
上記のサイトから、
swap_128Mb.bz2というファイルをダウンロードしてきて下さい。
こちらはswapのイメージで、今回は128MBで構築します。
これでダウンロード作業は完了です!インストールにとりかかりましょう。
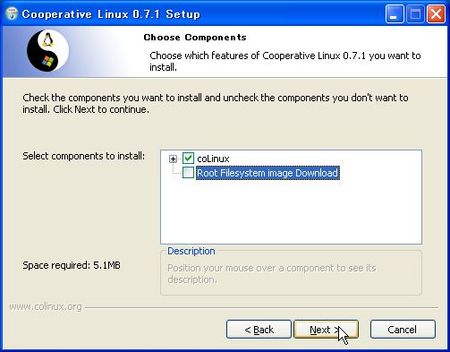
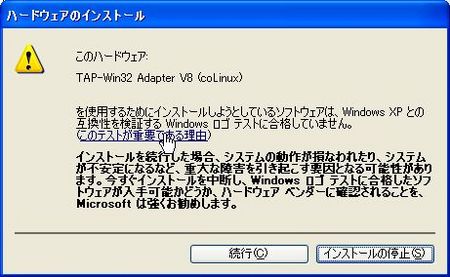
coLinux本体のインストール

debianのイメージを解凍する
coLinuxのインストールが終わったつぎは、Debianのイメージとswapのイメージファイルを解凍しましょう。
圧縮形式がbz2になっていますので、もし解凍できるアプリケーションをもっていなければダウンロードしてきて下さい。
自分はLhaplusを利用しています。
解凍が完了したら、それぞれリネーム&ファイルの移動をして下さい。
それぞれ、下記の場所に設置をしてリネームをしています。
- FileSystemImage
- 解凍したときのファイル名
- Debian-4.0r0-etch.ext3.1gb.bz2
- リネーム後のファイル名
- debian.img
- 設置先
- C:\Program Files\coLinux\debian.img
- swapのイメージファイル
- 解凍したときのファイル名
- swap_128Mb
- リネーム後のファイル名
- swap.img
- 設置先
- C:\Program Files\coLinux\swap.img
windows側のNetworkの設定をする
それでは、coLinux側からネットワークに接続する設定をします。今回はNATで設定するようにします。
スタート
↓
接続
↓
すべての接続の表示
をクリックして下さい。 下記の写真のように、TAP-Win32が表示されるのを確認します。 この時点での表示方法を確認して下さい。(写真では、ローカルエリア接続3) 次はローカルエリア接続をクリックし詳細設定のタブを選択してください。
なおネットワークへの接続が無線LAN経由の人は、ワイヤレスネットワーク接続を選択して下さい。
インターネット接続の共有からネットワークのほかのユーザーに・・・のチェックボックスにチェックをいれます。
ホームネットワークの接続には、先程確認したcoLinuxのネットワーク接続からの許可をいれます。
この場合は、ローカルエリア接続3から許可をします。
次はローカルエリア接続をクリックし詳細設定のタブを選択してください。
なおネットワークへの接続が無線LAN経由の人は、ワイヤレスネットワーク接続を選択して下さい。
インターネット接続の共有からネットワークのほかのユーザーに・・・のチェックボックスにチェックをいれます。
ホームネットワークの接続には、先程確認したcoLinuxのネットワーク接続からの許可をいれます。
この場合は、ローカルエリア接続3から許可をします。

をクリックして下さい。 下記の写真のように、TAP-Win32が表示されるのを確認します。 この時点での表示方法を確認して下さい。(写真では、ローカルエリア接続3)
次はローカルエリア接続をクリックし詳細設定のタブを選択してください。
なおネットワークへの接続が無線LAN経由の人は、ワイヤレスネットワーク接続を選択して下さい。
インターネット接続の共有からネットワークのほかのユーザーに・・・のチェックボックスにチェックをいれます。
ホームネットワークの接続には、先程確認したcoLinuxのネットワーク接続からの許可をいれます。
この場合は、ローカルエリア接続3から許可をします。
coLinuxの設定ファイルを書く
それではインストールが完了しましたので、立ち上げるための設定ファイルを記述しましょう。
coLinuxをインストールしたフォルダの直下(この場合は、C:\Program Files\coLinux)に、debian.confというファイルを作成して下さい。
そのファイルには、以下の内容を記述します。なお、ファイルの最後には必ず改行を入下さい。
これを入れないとcoLinuxが立ち上がりません。
kernel=vmlinux

cobd0="c:\Program Files\coLinux\debian.img"   # FileSystemImageの指定

cobd1="c:\Program Files\coLinux\swap.img"     # swapImageの指定

initrd="c:\Program Files\coLinux\initrd.gz"   # initrdの指定

mem=128                                       # 使用するメモリの指定

eth0=tuntap

root=/dev/cobd0
coLinuxを立ち上げる!
それでは立ち上げましょう!といっても、直接coLinuxの実行ファイルをダブルクリックしても起動させることはできません。
先程設定したdebian.confという設定ファイルを読ませて必要があります。
スタート
↓
すべてのプログラム
↓
アクセサリ
↓
コマンドプロンプト
を選択して下さい。
コマンドプロンプトの中で、下記のコマンド入力をしましょう。
下記の写真のようにCooperative Linux Consoleというウィンドウが立ち上がれば成功です!
C:\WINDOWS\system32> cd "c:\Program Files\coLinux"

C:\WINDOWS\system32> colinux-daemon.exe @"debian.conf"
Networkの設定をする
それではNetworkの設定をしましょう。まずログイン下さい。
デフォルトの設定では、user:root / password:root でログインできるはずです。
これでNetworkの設定ファイルを記述したいところですが、viが入っていません。
nanoを利用して記述をします。
最後は、CTRL+O -> CTRL+X で保存後抜けられます。 ︵もっとよい操作方はあると思います。。︶ ではNICを再起動しましょう。以下のコマンドをたたいてください。
# nano /etc/network/interfacesauto lo

iface lo inet loopbackauto eth0

iface eth0 inet static

   address 192.168.0.2

   netmask 255.255.255.0

   gateway 192.168.0.1
エラーメッセージ等表示されなければ正常に認識されていると思います。それでは確認します。
# /sbin/ifdown eth0

# /sbin/ifup eth0
上記のように、eth0側のIPアドレスが先程設定しました、192.168.0.2になっていればOKです。 続いてnameserverを指定しましょう。nanoを立ち上げ、以下の記述をして下さい。
# /sbin/ifconfig

eth0      Link encap:Ethernet  HWaddr 00:FF:3B:A6:D2:00

          inet addr:192.168.0.2  Bcast:192.168.0.255  Mask:255.255.255.0

          inet6 addr: fe80::2ff:3bff:fea6:d200/64 Scope:Link

          UP BROADCAST RUNNING MULTICAST  MTU:1500  Metric:1

          RX packets:233 errors:0 dropped:0 overruns:0 frame:0

          TX packets:140 errors:0 dropped:0 overruns:0 carrier:0

          collisions:0 txqueuelen:1000

          RX bytes:33013 (32.2 KiB)  TX bytes:19379 (18.9 KiB)

          Interrupt:2lo        Link encap:Local Loopback

          inet addr:127.0.0.1  Mask:255.0.0.0

          inet6 addr: ::1/128 Scope:Host

          UP LOOPBACK RUNNING  MTU:16436  Metric:1

          RX packets:0 errors:0 dropped:0 overruns:0 frame:0

          TX packets:0 errors:0 dropped:0 overruns:0 carrier:0

          collisions:0 txqueuelen:0

          RX bytes:0 (0.0 b)  TX bytes:0 (0.0 b)
最後にはNetworkの疎通を確認です。DefaultGateway,そして外部にpingを打ちます。
# nano /etc/resolv.conf

nameserver 192.168.0.1
上記のようにPingがちゃんとかえってくれば成功です! これで基本的な設定は完了です。最後は使用する上での最低限の設定をします。
# /bin/ping 192.168.0.1

PING 192.168.0.1 (192.168.0.1) 56(84) bytes of data.

64 bytes from 192.168.0.1: icmp_seq=1 ttl=128 time=0.497 ms

64 bytes from 192.168.0.1: icmp_seq=2 ttl=128 time=0.460 ms# ping 0.pool.ntp.org

PING 203.141.148.250 (203.141.148.250) 56(84) bytes of data.

64 bytes from 203.141.148.250: icmp_seq=1 ttl=52 time=43.1 ms

64 bytes from 203.141.148.250: icmp_seq=2 ttl=52 time=44.0 ms
userアカウントの設定
それではLinuxの立ち上げ、Networkの設定まで完了したのでこれが最後になります。
いままではrootログインをしていましたが、一般ユーザーのアカウントの作成とパスワードの変更をします。
# /usr/sbin/useradd wadap

# /usr/bin/passwd wadap

Enter new UNIX password:

Retype new UNIX password:

passwd: password updated successfully
