JenkinsでPHPプログラムをデバッグしてみよう!!
Ⅰ‥環境
以下の環境で設定を行ないました。 ・OS:Centos6 ・PHP‥5.3 ・フレームワーク‥ZendFramework ・JenkinsURL‥http://jenkins.example.com:8080 ︵URLはJenkinsをインストールしたマシンのアドレスに変更してください︶Ⅱ‥サーバ上に準備するもの
1‥必要なソフト一覧
①‥Phing phpcs,phpmd,phpcpd,phpDocumentor,phpunitを一括管理することができるツール ②‥Mercurial バージョン管理を行うツールです 弊社ではバージョン管理ツールはMercurialをつかっているため、ここではMercurialを使った方法を記入します。 ︵Jenkinsはgit, subversionでも利用可能です。︶ ③‥phpcs コーディング規約チェックツール ④‥phpmd PHPプログラム内のバグになりそうな箇所をチェックしてくれます 利用していない変数等をチェックします ⑤‥phpcpd コードの重複をチェックしてくれます ⑥‥PHPDocumentor PHPDocumentorに添って記述されたコメントから、HTMLドキュメントを作成するツールです ⑦‥phpunit PHPテストコードを実行するツールです ⑧‥xdebug PHPコードカバレッジを行うために必要です ⑨‥Jenkins Jenkins本体です2‥インストール方法
以下全てはjenkins.example.com上で行ったものとしています。 (全てroot権限で作業しています) ①‥Phing ・まず必要なライブラリをインストールし設定します。# yum install gcc ImageMagick ImageMagick-devel php-devel -y # vi /etc/php.d/imagick.ini/etc/php.d/imagick.iniには以下のように記入ください
extension=imagick.so・pearでphingをインストールします
# pear channel-discover pear.phing.info # pear channel-discover pear.pdepend.org # pear channel-discover pear.phpmd.org # pear channel-discover pear.phpunit.de # pear channel-discover pear.phpdoc.org # pear channel-discover pear.symfony.com # pear channel-discover pear.netpirates.net # pear install -a --force phing/phing②‥Mercurial yum 経由でインストールします
# yum install mercurial③‥phpcs ①のPhingをインストールすると同時にインストールされます ④‥phpmd ①のPhingをインストールすると同時にインストールされます ⑤‥phpcpd ①のPhingをインストールすると同時にインストールされます ⑥‥PHPDocumentor ①のPhingをインストールすると同時にインストールされます ⑦‥phpunit ①のPhingをインストールすると同時にインストールされます ⑧‥xdebugの設定 PHPカバレッジレポートを作成するにあたってxdebugが必要です ①のPhingをインストールすると同時にインストールされます ただし以下の設定をおこなう必要があります
# cd /etc/php.d # vi xdebug.ini/etc/php.d/xdebug.iniには以下のように記入します
zend_extension=/usr/lib64/php/modules/xdebug.so⑨‥Jenkins ・yum 経由でインストールします
# cd /etc/yum.repos.d/ # wget http://pkg.jenkins-ci.org/redhat/jenkins.repo # rpm --import http://pkg.jenkins-ci.org/redhat/jenkins-ci.org.key # yum install -y jenkins # yum install -y java-1.6.0-openjdk注︶‥jenkinsは8080番ポートでつなぐのでiptablesで8080番ポートのアクセスを許可しておいてください http://jenkins.example.com:8080 でJenkinsの画面が表示されればインストールは成功です。 ︵URLはJenkinsをインストールしたマシンのアドレスに変更してください︶
Ⅲ‥デバッグ対象プログラム設定
︵以下は一般権限のユーザで設定してください︶ ①‥ZendFrameworkでプログラム作成 http://framework.zend.com/ から1.12.6のファイルをダウンロードしてください ②‥Linux上で解凍してください ここでは /var/www/html上で解凍し、hogeという名前のディレクトリに変更します# cd /var/www/html # tar xvfz ZendFramework-1.12.6-minimal.tar.gz # mv ZendFramework-1.12.6-minimal hoge③‥初期設定をします ・ZendFrameworkに付属のzf.shで初期設定をします
# cd /var/www/html # ./hoge/bin/zf.sh create project ./hoge④‥composerを設定します ・composerはプロジェクト単位で必要なライブラリをインストールできるツールです 今回はPHPUnitの設定で使います
# cd /var/www/html/hoge # curl -sS https://getcomposer.org/installer | php # php composer.phar install⑤‥phpunitへのパスをtests︵テストプログラム用ディレクトリ︶以下のbootstrap.phpに記入します ・tests/bootstrap.php の2行目に記入します
<?php require_once '../vendor/autoload.php';⑥‥phpunit用のテストコードを記入します。 ・phpunit用のテストコードの記入方法はこちらを参考にしてください。 ・tests/application/controllers/IndexContorollerTest.php にテストコードを記入します
<?php
class IndexControllerTest extends Zend_Test_PHPUnit_ControllerTestCase
{
    public function setUp()
    {
        $this->bootstrap = new Zend_Application(APPLICATION_ENV, APPLICATION_PATH . '/configs/application.ini');
        parent::setUp();
    }
    public function testHoge()
    {
        $stack = array();
        $this->assertEquals(0, count($stack));
    }
}
⑦‥phing用の設定ファイルを作成します
・/var/www/html/hoge/buid.xml に以下の内容で作成します
・phpcs, phpmd, phpcpd, phpdocumentor, phpunitの設定を記入しています
<?xml version="1.0" encoding="utf-8"?>
<project name="phingtest" default="build">
  <property name="basedir" value="${phing.dir}" />
  <property name="appdir"  value="${basedir}/application" />
  <property name="datadir" value="${basedir}/data" />
  <property name="logdir"  value="${datadir}/build/logs" />
  <target name="build" depends="clean,prepare,phpcs,phpmd,phpcpd,phpdoc,phpunit">
  </target>
  <target name="clean" description="clean">
    <delete dir="${logdir}" />
    <delete dir="${datadir}/build/coverage" />
    <delete dir="${datadir}/build/phpdoc" />
  </target>
  <target name="prepare" description="prepare">
    <mkdir dir="${logdir}" />
    <mkdir dir="${datadir}/build/coverage" />
    <mkdir dir="${datadir}/build/phpdoc" />
  </target>
  <target name="phpcs" description="PHPCS">
    <phpcodesniffer standard="Zend" file="${appdir}/" allowedFileExtensions="php">
      <formatter type="checkstyle" outfile="${logdir}/phpcs.xml" />
    </phpcodesniffer>
  </target>
  <target name="phpmd" description="PHPMD">
    <exec dir="${basedir}" executable="phpmd" output="${logdir}/phpmd.log">
      <arg line="${appdir}" />
      <arg line="xml" />
      <arg line="${basedir}/phpmd-rule.xml" />
      <arg line="--reportfile ${logdir}/phpmd.xml" />
      <arg line="--suffixes php" />
    </exec>
  </target>
  <target name="phpcpd" description="PHPCPD">
    <exec dir="${basedir}" executable="phpcpd" output="${logdir}/phpcpd.log">
      <arg line="--log-pmd ${logdir}/phpcpd.xml" />
      <arg line="--names *.php,*.phtml" />
      <arg line="${appdir}" />
    </exec>
  </target>
  <target name="phpdoc" description="Generate Application Documentation using PHPDocumentor2">
    <exec dir="${basedir}" executable="phpdoc" output="${logdir}/phpdoc.log">
      <arg line="run" />
      <arg line="-t ${datadir}/build/phpdoc" />
      <arg line="-d ${appdir}" />
      <arg line="-p" />
    </exec>
  </target>
  <target name="phpunit" description="run phpunit">
    <exec dir="${basedir}/tests" executable="phpunit" output="${logdir}/phpunit.log">
      <arg line="--configuration=${basedir}/tests/phpunit.xml" />
      <arg line="--log-junit=${logdir}/phpunit.xml" />
      <arg line="--coverage-html=${datadir}/build/coverage/" />
      <arg line="--coverage-clover=${logdir}/coverage.xml" />
    </exec>
  </target>
</project>
⑧‥phpmd-rule.xmlを作成
・/var/www/html/hoge/phpmd-rule.xml に以下の内容で作成します
<?xml version="1.0" encoding="UTF-8"?>
<!--
    PHPMD rule set file.
    @link http://phpmd.org/
-->
<ruleset name="PHPMD rule set for CakePHP"
    xmlns="http://pmd.sf.net/ruleset/1.0.0"
    xmlns:xsi="http://www.w3.org/2001/XMLSchema-instance"
    xsi:schemaLocation="http://pmd.sf.net/ruleset/1.0.0
    http://pmd.sf.net/ruleset_xml_schema.xsd"
    xsi:noNamespaceSchemaLocation="http://pmd.sf.net/ruleset_xml_schema.xsd">

    <description>PHPMD rule set</description>

    <!-- Import rule set -->
    <rule ref="rulesets/codesize.xml" />
    <rule ref="rulesets/design.xml" />
    <rule ref="rulesets/naming.xml">
        <!-- Exclude the rule for variable like $id, that baked by CakePHP. -->
        <exclude name="ShortVariable" />
    </rule>
    <rule ref="rulesets/naming.xml/ShortVariable">
        <properties>
            <property name="minimum" description="Minimum length for a variable" value="2"/>
        </properties>
    </rule>
    <rule ref="rulesets/unusedcode.xml" />
</ruleset>
⑨‥tests/phpunit.xml を編集
・/var/www/html/hoge/tests/phpunit.xml
・カバレッジレポート用の設定を追加 whitelist を編集、カバレッジレポート対象は application以下全てのphpファイルにしています
<phpunit bootstrap="./bootstrap.php"> <testsuite name="Application Test Suite"> <directory>./application</directory> </testsuite> <testsuite name="Library Test Suite"> <directory>./library</directory> </testsuite> <filter> <!-- If Zend Framework is inside your project's library, uncomment this filter --> <whitelist> <directory suffix=".php">../application</directory> </whitelist> </filter> </phpunit>⑩ ‥mercurialリポジトリにプログラム全てを登録します。 ・mercurialリポジトリは社内開発用にあればそちらに合わせてください ・ここでは bitbucket.org を使った利用方法を説明します ・bitbucketにユーザがなければ新規作成しておいてください ︵ここでは ユーザ名‥scott パスワード‥tiger で作成した場合です︶ ・bitbucketにログインしたら、hoge リポジトリを作成します
# cd /var/www/html/hoge # hg init # hg add # hg commit -m '初期プログラムの追加' -u scott (-u のところには貴方の名前を入れてください、ここではhogeとしています) # hg push https://scott:tiger@bitbucket.org/scott/hoge (ファイル数が多いので、多少時間がかかります)以上で準備は完了です
Ⅳ‥Jenkins設定
①‥Jenkinsを開きます http://jenkins.example.com:8080/ ︵URLはJenkinsをインストールしたマシンのアドレスに変更してください︶ ②‥Jenkinsの管理をクリックします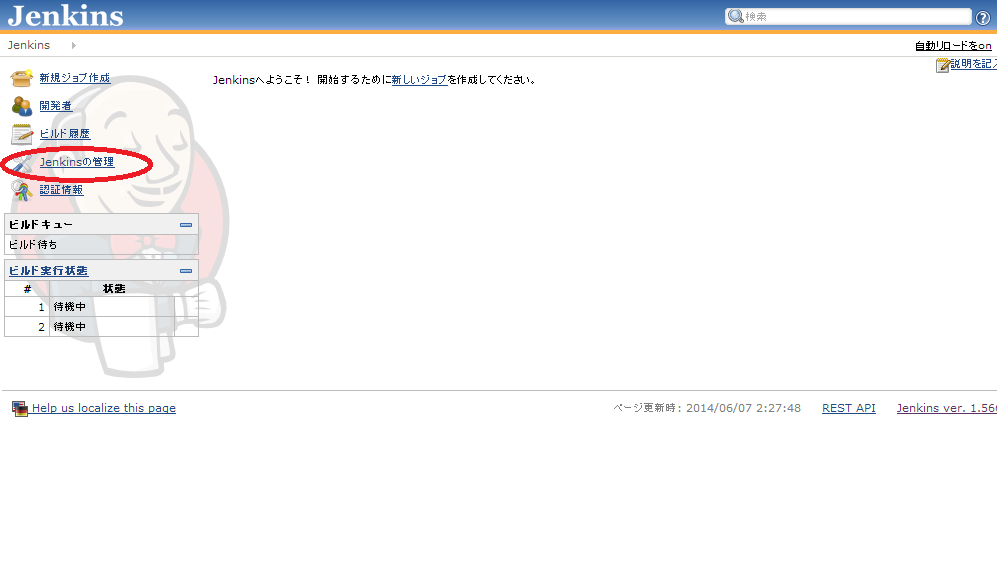 ③‥プラグインの管理をクリックします
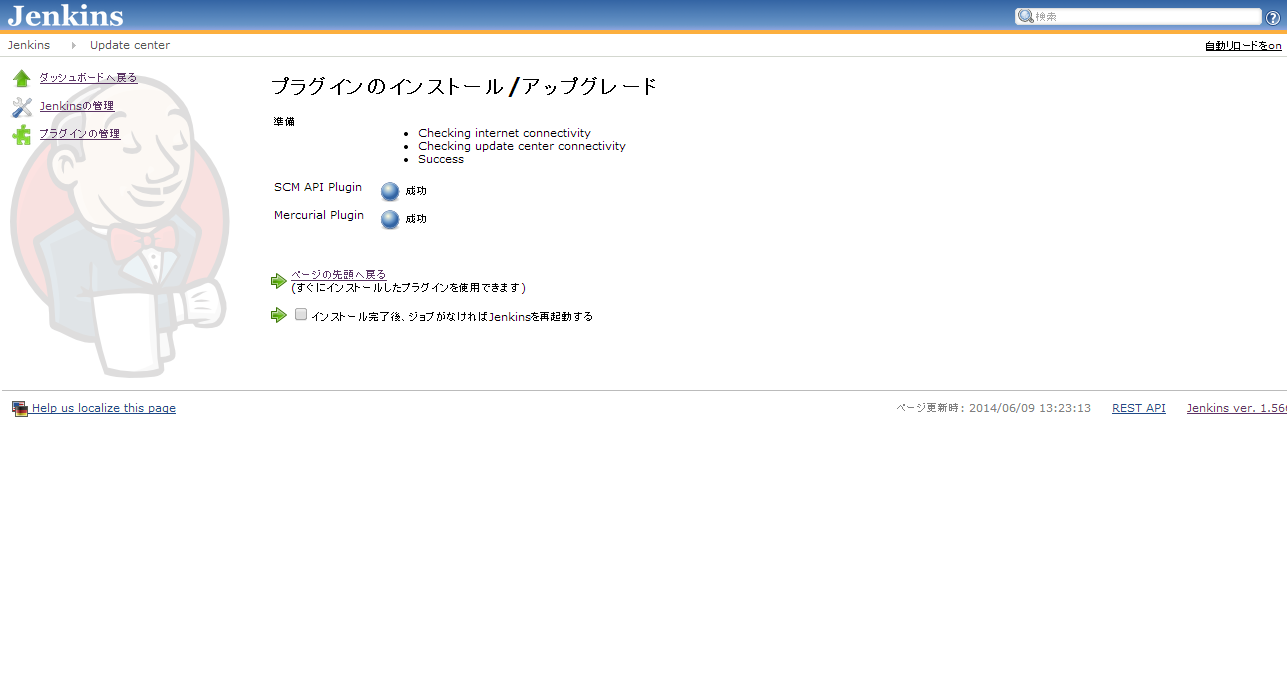
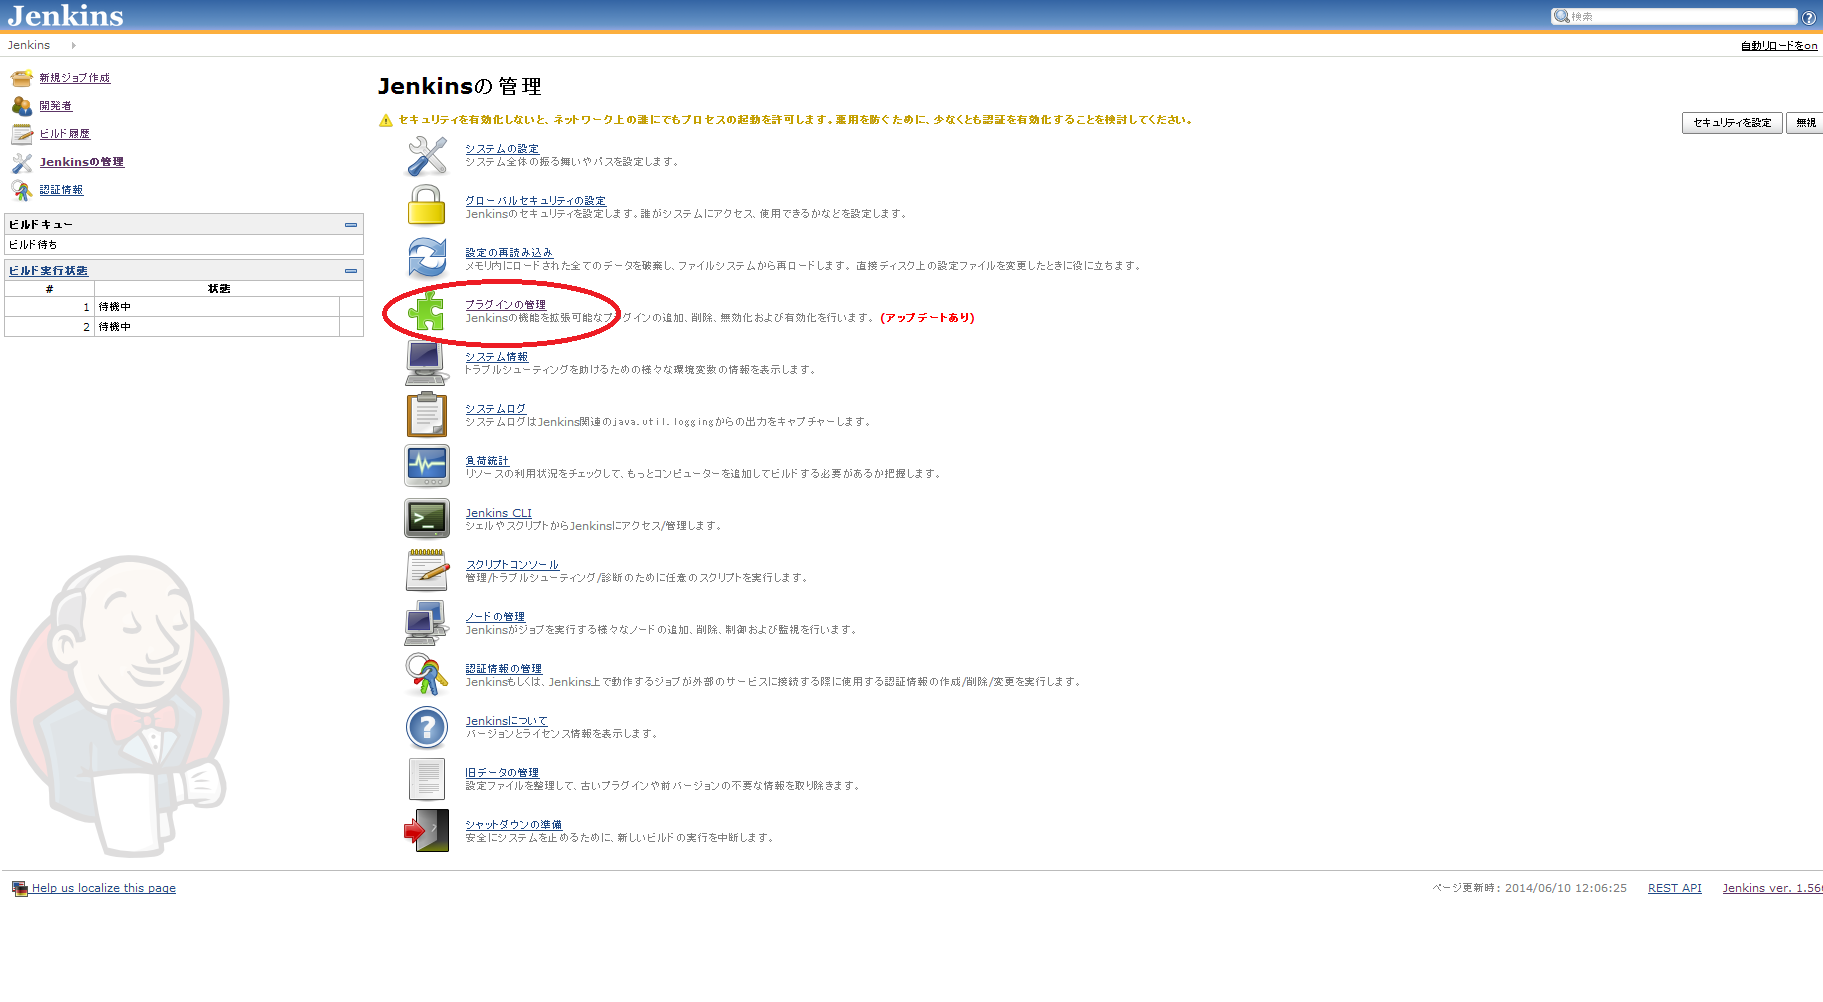 ④‥mercurialプラグインを選択して﹁再起動せずにインストール﹂をします

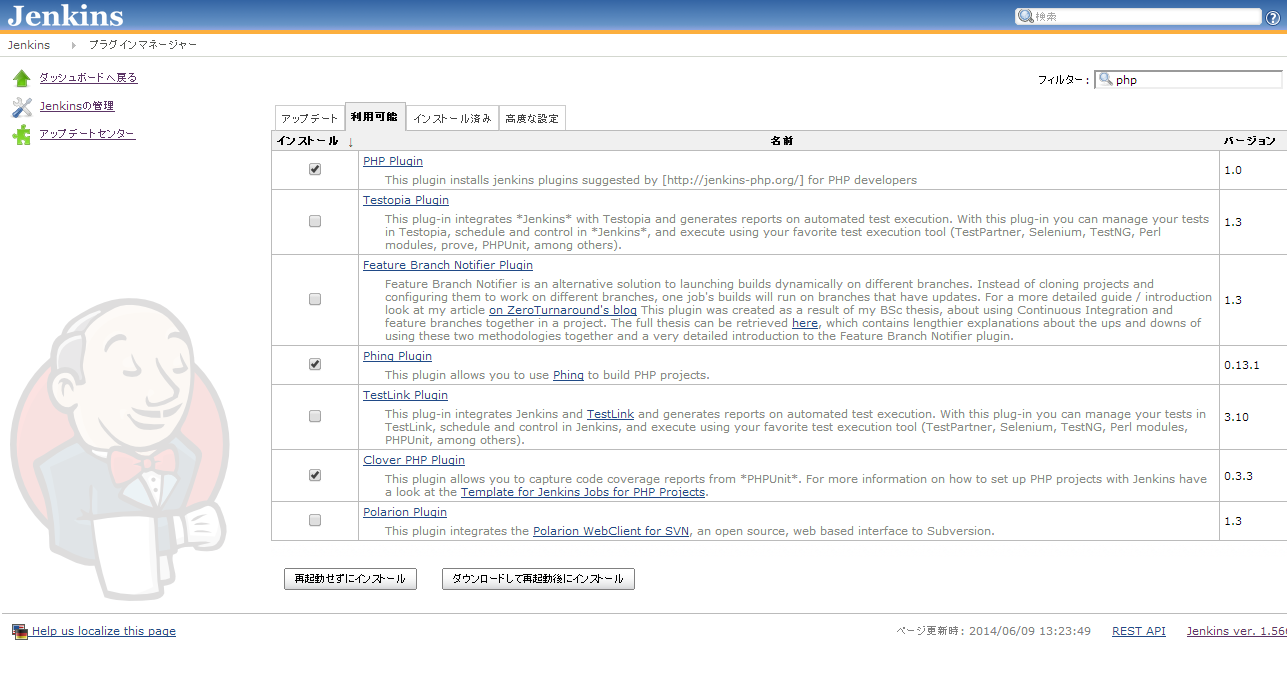
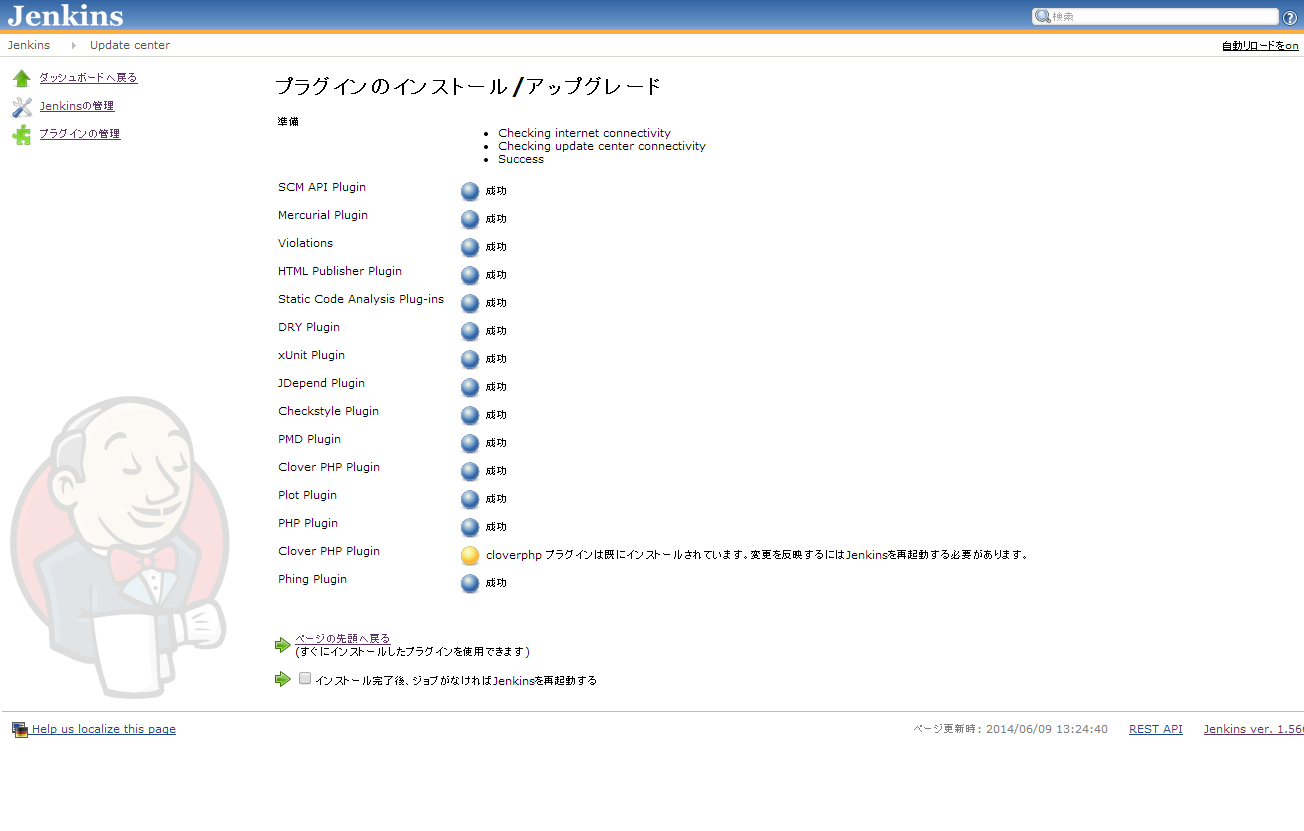
 ⑤‥phpに関連するプラグインをインストールします
﹁PHP Plugin﹂﹁Phing Plugin﹂﹁Clover PHP Plugin﹂を選択します
⑤‥phpに関連するプラグインをインストールします
﹁PHP Plugin﹂﹁Phing Plugin﹂﹁Clover PHP Plugin﹂を選択します
 ⑥‥新しいジョブを登録します
・ジョブ名は hoge とします
・フリースタイルプロジェクトのビルドを選択してください
⑥‥新しいジョブを登録します
・ジョブ名は hoge とします
・フリースタイルプロジェクトのビルドを選択してください
 ⑦‥mercurialの設定をします
・﹁ソースコード管理﹂で﹁Mercurial﹂を選択します
・URLにはbitbucketで作成したURLを記入してください。
ここではユーザ名‥scott、パスワード‥tiger としています︵ここはbitbucketで作成ユーザ名を入れてください︶
⑦‥mercurialの設定をします
・﹁ソースコード管理﹂で﹁Mercurial﹂を選択します
・URLにはbitbucketで作成したURLを記入してください。
ここではユーザ名‥scott、パスワード‥tiger としています︵ここはbitbucketで作成ユーザ名を入れてください︶
 ⑧‥﹁ビルド手順の追加﹂で﹁Phingの呼び出し﹂を追加します
・﹁ターゲット﹂には何も記入しません
⑧‥﹁ビルド手順の追加﹂で﹁Phingの呼び出し﹂を追加します
・﹁ターゲット﹂には何も記入しません
 ⑨‥﹁ビルド後の処理の追加﹂で﹁Checkstyle警告の集計﹂を追加し、
集計するファイルに data/build/logs/phpcs.xml と記入します
⑨‥﹁ビルド後の処理の追加﹂で﹁Checkstyle警告の集計﹂を追加し、
集計するファイルに data/build/logs/phpcs.xml と記入します
 ⑩‥﹁ビルド後の処理の追加﹂で﹁PMD警告の集計﹂を追加し
集計するファイルに data/build/logs/phpmd.xml と記入します
⑩‥﹁ビルド後の処理の追加﹂で﹁PMD警告の集計﹂を追加し
集計するファイルに data/build/logs/phpmd.xml と記入します
 ⑪‥﹁ビルド後の処理の追加﹂で﹁重複レコード分析の集計﹂を追加し、
集計するファイルに data/build/logs/phpcpd.xml と記入します
⑪‥﹁ビルド後の処理の追加﹂で﹁重複レコード分析の集計﹂を追加し、
集計するファイルに data/build/logs/phpcpd.xml と記入します
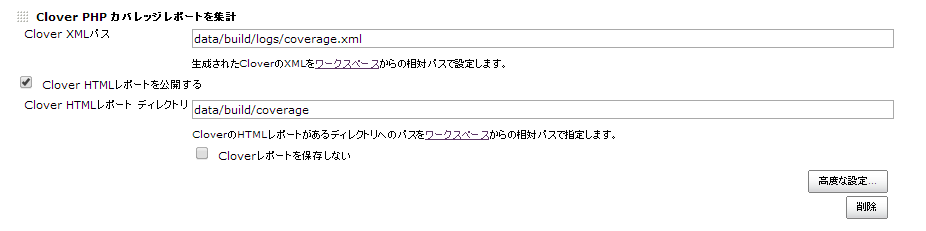
 ⑫‥﹁ビルド後の処理の追加﹂で﹁Clover PHP カバレッジレポートを集計﹂を追加し、
Clover XMLパスに data/build/logs/coverage.xml と記入します
⑫‥﹁ビルド後の処理の追加﹂で﹁Clover PHP カバレッジレポートを集計﹂を追加し、
Clover XMLパスに data/build/logs/coverage.xml と記入します
 ⑬‥結果をE-mailで連絡する場合は﹁ビルド後の処理の追加﹂で﹁E-mail通知﹂を追加し、
宛先に送信したいメールアドレスを記入します
⑬‥結果をE-mailで連絡する場合は﹁ビルド後の処理の追加﹂で﹁E-mail通知﹂を追加し、
宛先に送信したいメールアドレスを記入します
 ⑭‥以上で﹁保存﹂をクリックします。
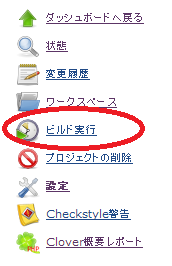
⑮‥左メニューから﹁ビルド実行﹂をクリックするとJenkinsが hoge プログラムのチェックを始めます
⑭‥以上で﹁保存﹂をクリックします。
⑮‥左メニューから﹁ビルド実行﹂をクリックするとJenkinsが hoge プログラムのチェックを始めます
 以下のように怒りのページが表示されてしまった場合は、設定を間違えている可能性があります。
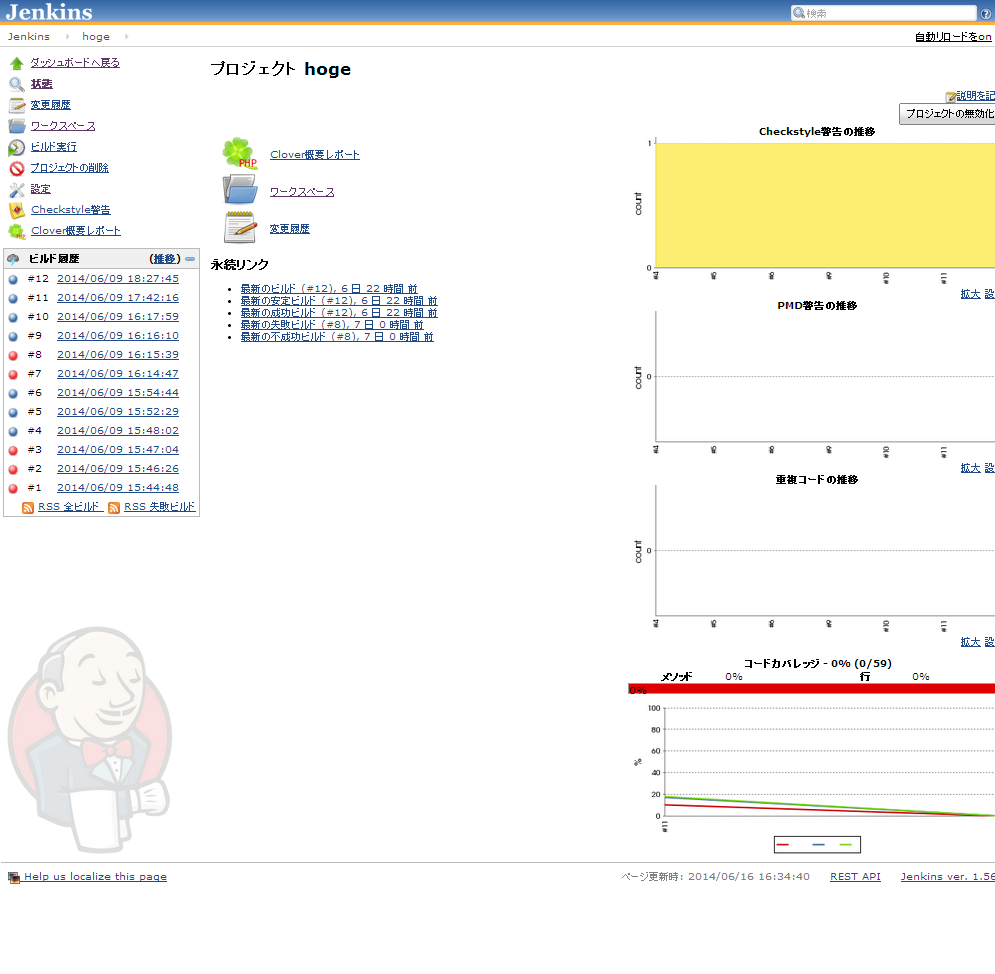
 ⑯‥ビルドの結果はTOPページで確認できます。
ビルド結果いろいろなエラーが見つかるかもしれません(泣)
⑯‥ビルドの結果はTOPページで確認できます。
ビルド結果いろいろなエラーが見つかるかもしれません(泣)
 以上で、JenkinsでPHPプログラムのデバッグ&テストができるようになりました。
みなさんそれぞれのプロジェクトで試してみてはいかがでしょうか?
Jenkinsの公式URLはこちらです
以上で、JenkinsでPHPプログラムのデバッグ&テストができるようになりました。
みなさんそれぞれのプロジェクトで試してみてはいかがでしょうか?
Jenkinsの公式URLはこちらです