各種攻撃からの防御方法と、シェルスクリプトを利用した設定方法を解説
 よくあるDos攻撃やLinuxのバグを利用した攻撃方法と、それぞれの対策を解説します。
シェルスクリプトを利用すれば、最新のIPリストを取得して特定の国からアクセスを遮断したり、動的に作成された拒否IPリストを利用することができます。
よくあるDos攻撃やLinuxのバグを利用した攻撃方法と、それぞれの対策を解説します。
シェルスクリプトを利用すれば、最新のIPリストを取得して特定の国からアクセスを遮断したり、動的に作成された拒否IPリストを利用することができます。
目次
2通りの設定方法 シェルスクリプトでiptablesの設定をする 全体のポリシーを設定 IP Spoofing攻撃と対策 Ping of Death攻撃と対策 Ping Flood攻撃と対策 Smurf攻撃と対策 + 不要ログ破棄 SYN flood攻撃と対策 ユーザー認証に使うAuth/IDENT用の113番ポートを拒否 拒否IPリストに記載されたIPからのアクセスを拒否する 最新の国別IP割り当てリストを取得して、特定の国からのアクセスを許可 リストを利用して、特定の国からのアクセスを拒否 ステートフル・パケットインスペクションを利用する 個別のサービスで利用するポートを開放する 上記の条件に当てはまらない通信を記録して破棄 設定を保存してiptablesを起動 作成したシェルスクリプトを実行2通りの設定方法
iptablesにルールを追加するには、2つのパターンがあります。 1つ目は設定ファイル﹁/etc/sysconfig/iptables﹂を直接編集する方法。 ほとんどのソフトがこの方法で設定を行うので、理解しやすく、変更点も把握しやすい。反面、全て手動で追加する必要がある。 2つ目はシェルスクリプト︵コマンド︶で編集する方法。 大量のIPリストを書き出したり、特定の設定︵web上のデータ︶と同期することも可能。シェルスクリプトやコマンドの扱いに慣れていないと多少敷居が高い。 今回はせっかくなので汎用性の高いシェルスクリプトで設定する方法を解説します。シェルスクリプトでiptablesの設定をする
シェルスクリプトの詳細な記述方法は解説しませんが、はじめての方でもわかるように、1つ1つ補足説明を加えて進めていきます。必要のない方は読み飛ばしてください。 また、今回はWeb、DNS、メール等を一元管理しているサーバを想定しています。自分のサーバで稼働していないポートを開ける必要はないので、環境に合わせて適宜読み替えてください。ルートユーザーでファイルを作成
iptablesを設定するのはrootユーザだと思うので、rootユーザーのホームディレクトリでシェルスクリプトを作成し作業をします。# su - ←「-」を付けてホームディレクトリへ移動 # vi iptables.sh ←iptables.shを新規作成viの使い方がおぼつかない方は﹁以前の投稿﹂で操作方法をご覧ください。
まずはシェルスクリプトの基本
bashへのパスを通すためにshebang︵シバン︶を設定します。おまじないのようなものなので、このまま記述してください。#!/bin/bash
iptablesを停止
まずiptablesを停止して設定をリセットします。 CentOSではstopすると設定をリセットしてくれます。Ubuntu等では﹁/sbin/iptables -F﹂として明示的にリセットする必要があります。/etc/rc.d/init.d/iptables stop
全体のポリシーを設定
ここからがiptablesに追加する設定です。 まずは全体に適用されるポリシーを設定します。受信と転送は破棄、送信はすべて許可しています。#ポリシーの設定 iptables -P INPUT DROP iptables -P OUTPUT ACCEPT iptables -P FORWARD DROP﹁-P INPUT DROP﹂で受信はすべて破棄。 ﹁-P OUTPUT ACCEPT﹂で送信はすべて許可。 ﹁-P FORWARD DROP﹂で通過はすべて破棄。
IP Spoofing攻撃と対策
ここからは各種攻撃に対する具体的な対処法を解説していきます。 IP Spoofing︵アイピー スプーフィング︶とはいわゆる成りすましのことです。ローカルの通信はフィルタリングを緩くするサーバが多いため、外部からローカルの通信に成りすましてサーバに侵入しようという攻撃です。 対策として、外部︵WAN側︶からプライベートIPアドレスに成りすました通信を破棄します。#IP Spoofing攻撃対策 iptables -A INPUT -i eth0 -s 127.0.0.1/8 -j DROP iptables -A INPUT -i eth0 -s 10.0.0.0/8 -j DROP iptables -A INPUT -i eth0 -s 172.16.0.0/12 -j DROP iptables -A INPUT -i eth0 -s 192.168.0.0/16 -j DROP iptables -A INPUT -i eth0 -s 192.168.0.0/24 -j DROP﹁-A INPUT﹂で新しい受信に関するルールを追加。 ﹁-i﹂でインターフェイスを﹁eth0︵外部ネットワーク︶﹂に限定しています。 ﹁-s﹂で﹁送信元﹂を指定。通常外部からプライベートIPでアクセスすることはありません。 ﹁-j DROP﹂で一致したターゲットを破棄しています。 外部ネットワークは以下のコマンドで確認することができます。
# ifconfig
tsharkをインストール済みであれば以下のコマンドでも確認できます。
# tshark -D
それぞれのIPの意味
| 127.0.0.1/8 | loopbackアドレス |
|---|---|
| 10.0.0.0/8(10.0.0.0~10.255.255.255) | クラスAのプライベートIPアドレス |
| 172.16.0.0/12(172.16.0.0~172.31.255.255) | クラスBのプライベートIPアドレス |
| 192.168.0.0/16(192.168.0.0~192.168.255.255) | クラスCのプライベートIPアドレス |
| 192.168.0.0/24(192.168.0.0~192.168.0.255) | クラスCのプライベートIPアドレス |
Ping of Death攻撃と対策
Ping of Death︵ピング オブ デス︿PoD﹀︶攻撃とは、サイズの大きなPingを受け取るとサーバが停止するというバグを利用した攻撃です。Pingとはサーバの動作を確認する際に利用されます。
最新のディストリビューションでは対策が取られており、実害が出ることは稀ですが、攻撃する意図を持ったIPを特定するという意味でログファイルへ記録します。
今回は設定以上のサイズを持つPingを拒否することで対策を取ります。通常pingのサイズはWindowsであれば32バイトで、linuxであれば56バイトです。
実際にはICMPのヘッダ︵8バイト︶やTCPのヘッダー︵20バイト︶が付くので、84バイトになります。そこで85バイト以上のPingを破棄します。
この辺から複雑になってきますが、1つ1つの要素に分解すると簡単です。
# Ping攻撃対策 iptables -N PING_ATTACK iptables -A PING_ATTACK -m length --length :85 -j ACCEPT iptables -A PING_ATTACK -j LOG --log-prefix "[IPTABLES PINGATTACK] : " --log-level=debug iptables -A PING_ATTACK -j DROP iptables -A INPUT -p icmp --icmp-type 8 -j PING_ATTACK2行目の﹁-N PING_ATTACK﹂でPING_ATTACKという名前のユーザー定義チェインを作成。 3行目の﹁-A PING_ATTACK﹂で作成したPING_ATTACKチェインに新しいルールを作成。 ﹁-m length﹂でlength拡張を利用します。 ﹁--length :85﹂でサイズが85バイト以下のパケットに一致。 ﹁-j ACCEPT﹂で一致するパケットを許可。 4行目﹁-j LOG﹂で上記で許可された以外のパケットをログファイルへの書き出し。 ﹁--log-prefix﹂でログファイルの接頭辞を﹁[IPTABLES PINGATTACK] : ﹂に指定。︵接頭辞は後にログファイルを振り分ける際に利用します。︶ ﹁--log-level=debug﹂でログレベルを﹁debug﹂に指定。 5行目﹁-A PING_ATTACK -j DROP﹂で上記で許可された以外のパケット︵ログへ書きだしたパケット︶を破棄。 6行目﹁-p icmp --icmp-type 8﹂でICPMがEcho Message︵エコー要求通知︶のもの、つまりpingを指定。 ちなみに﹁--icmp-type 8﹂の﹁8﹂は﹁echo-request﹂と書き換えることもできます。 ﹁-j PING_ATTACK﹂で作成したユーザー定義チェインへジャンプ︵適用︶する。 長くなったのでまとめると、受信したPingに対して85バイト以下のものを許可。それ以上のサイズのPingをログファイルに保存して破棄という設定になります。
Ping Flood攻撃と対策
Ping Flood︵ピング フラッド︶攻撃とは、Pingを短時間に大量に送ることで応答を遅らせたり、サーバを停止させる攻撃です。単純な攻撃ですが、対策をしていないと被害が出ます。このPing Flood攻撃を上のPing of Death攻撃と混同する例もありますが、対策が異なるためこのページでは分けて考えます。 Ping of Death攻撃はPingのサイズで対策していましたが、Ping Flood攻撃は時間あたりのPing数で対策をします。同じPingに対する制限なのでlengthモジュールを指定した行に追記します。 pingは通常4回1セットで確認することが多いため、4回以上pingを受信した場合、以降は1秒間に1度だけ許可します。# Ping攻撃対策 + Ping Flood攻撃対策 iptables -A PING_ATTACK -p icmp --icmp-type 8 -m length --length :85 -m limit --limit 1/s --limit-burst 4 -j ACCEPT追加した部分のみ解説します。 ﹁-m limit﹂でリミットモジュールを利用。 ﹁--limit 1/s﹂でリミット発動時に、1秒間に1度だけ許可。 ﹁--limit-burst 4﹂で4回までは無条件に許可、それ以上になるとリミット発動。リミット発動後も上の﹁--limit 1/s﹂の時間が経過すると1つずつリミットの数が解消される。この例では最後のアクセスから4秒経つと、再び4回まで無条件で許可する。 これで、85バイト以上のPingと、連続して5回以上受信したPingに制限を設けることができました。
Smurf攻撃と対策 + 不要ログ破棄
Smurf︵スマーフ︶攻撃とは、送信元を偽装してPingを大量に送る攻撃です。攻撃するツールの名前がSmurfだったことから名付けられました。 送信元を偽装をしたり、Pingを利用する点ではIP Spoofing攻撃と同じですが、Smurf攻撃ではブロードキャスト・アドレスを利用するという特徴を持ちます。ブロードキャスト・アドレスとは 接続された全ての機器に対してデータを送信するアドレスのことです。このアドレスにPing(エコーリクエスト)を送ると、同一ネットワークで繋がれた全ての機器が応答メッセージ(エコーリプライ)を送ります。 ブロードキャスト・アドレスの中でも「255.255.255.255」のことをリミテッド・ブロードキャスト・アドレスと呼びます。 同じような働きをするマルチキャストアドレス(224.0.0.1)やディレクティッド・ブロードキャスト・アドレス(環境によって異なる)というアドレスもあります。攻撃者はブロードキャスト・アドレスへ、攻撃対象のIPになりすまして、pingを送リます。すると偽装したIP宛に、全ての機器から︵エコーリプライ︶が送信されます。つまり1つのPingを大量のエコーリプライに変換して攻撃することが可能になります。
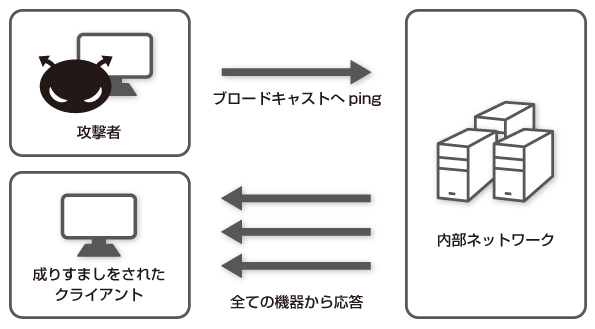
このようにSmurf攻撃の場合は、ブロードキャストからのパケットを破棄して身を守るという対策と、ブロードキャストへの応答をしないようすることで踏み台にされないようにするという2つの対策が有効です。
ディレクティッド・ブロードキャスト・アドレスはコマンドで以下のように打つとわかります。
# ifconfig
eth0      Link encap:Ethernet  HWaddr 00:16:3E:13:2F:39
          inet addr:192.168.0.0  Bcast:192.168.0.255  Mask:255.255.255.0
          UP BROADCAST RUNNING MULTICAST  MTU:1500  Metric:1
          …
﹁eth0﹂の﹁Bcast:﹂に書いてあるIPアドレスがそうです。今回の例では192.168.0.255とします。
iptables.shには以下のように追記してください。
# Smurf攻撃対策+不要ログ破棄 iptables -A INPUT -d 255.255.255.255 -j DROP iptables -A INPUT -d 224.0.0.1 -j DROP iptables -A INPUT -d 192.168.0.255 -j DROPIPの前にある指定するパラメータが﹁-d﹂になっている点に注意してください。﹁-d﹂で宛先︵サーバ側︶のIPを指定。Smurf攻撃に利用されるアドレスに一致させます。 IP Spoofing攻撃対策では送信先︵クライアント側︶を示す﹁-s﹂で一致させていました。
Smurf攻撃の踏み台にされないように対策
上記の対策でパケットを破棄しているので、Smurf攻撃の対策はできています。 更に安全性を高めるために、Linuxカーネルでブロードキャスト宛のPingに応答しないようにすることも可能です。 この設定を有効にすれば、たとえブロードキャスト宛のPingを受信したとしても応答しないため、Smurf攻撃の踏み台にされることもなくなります。icmp_echo_ignore_broadcastsを1にすることでブロードキャスト宛のPingに応答しない
/bin/echo "1" > /proc/sys/net/ipv4/icmp_echo_ignore_broadcastsもしくは
sysctl -w net.ipv4.icmp_echo_ignore_broadcasts=1上記の方法は即座に反映されますが、﹁/etc/sysctl.conf﹂に以下の設定を追加することで、再起動時も有効にすることが可能です。
# Disable Broadcast Ping
net.ipv4.icmp_echo_ignore_broadcasts=1
シェルスクリプトを使って設定を有効にする方法
上記のように手動で設定することも可能ですが、せっかくシェルスクリプトを利用しているので、上記の設定を﹁iptables.sh﹂に書いてみます。 iptablesの設定をするのと同時にLinuxのカーネルを変更することができます。# Smurf攻撃対策 sysctl -w net.ipv4.icmp_echo_ignore_broadcasts=1 > /dev/null sed -i '/# Disable Broadcast Ping/d' /etc/sysctl.conf sed -i '/net.ipv4.icmp_echo_ignore_broadcasts/d' /etc/sysctl.conf echo "# Disable Broadcast Ping" >> /etc/sysctl.conf echo "net.ipv4.icmp_echo_ignore_broadcasts=1" >> /etc/sysctl.conf2行目でicmp_echo_ignore_broadcastsを1にしています。後に続く﹁> /dev/null﹂は設定をした時の画面出力︵エラーメッセージ等︶を表示しないようにする設定です。 3~4行目﹁sed -i ‘/hoge/d’﹂で指定した文字列を含む行を削除しています。既に﹁net.ipv4.icmp_echo_ignore_broadcasts﹂に関する設定がある場合に削除します。またシェルスクリプトが実行されるごとに設定を書き込むと、同じ設定が重複してしまうので、﹁0﹂が設定されていても﹁1﹂が設定されていても削除するように、﹁net.ipv4.icmp_echo_ignore_broadcasts﹂に一致するように指定しています。 5~6行目で﹁/etc/sysctl.conf﹂に設定を書き込んでいます。特に指定していないので、ファイルの最終行に追記されます。 ちなみにこの対策をすることでSmurf攻撃の踏み台にされることはなくなりますが、攻撃対象にされた場合には効果がありません。上のパケットフィルタリングと併用してください。
不要なログを破棄する
IP Spoofing攻撃対策では﹁-i eth0﹂と外部からのアクセスに限定していましたが、今回は同じネットワークからのアクセスも破棄しています。 これにはわけがあリます。例えばオンラインストレージサービスのDropboxにはLAN Syncという機能があります。これはLAN内のコンピュータで同期をするための機能なのですが、同期をとるためにブロードキャスト・アドレス︵リミテッド、ディレクティッド共に︶を利用しています。悪いことにアクセスが30秒で2回とかなりの頻度です。 今回の設定では攻撃を未然に察知するために、最終的に設定したルールに一致しないパケットをログに保存します。 ここでLAN内のブロードキャストについて一致させて破棄しないと、ログにはLAN Syncによる記録だらけになってしまいます。そもそもブロードキャスト宛のPingをVPS等で内部ネットワークに流すことは意味が無いだけでなく、他の契約者にとっては迷惑でしかありません。 今回のように﹁悪意がないと判明している通信は破棄してログに残さない﹂というのも、ファイアウォールの設定の1つです。SYN flood攻撃と対策
SYN flood(スィン・フラッド)攻撃とは、TCPの3ウェイ・ハンドシェイクを利用した攻撃手法です。 上記のPingを利用した攻撃ではUDPの成りすましが可能という弱点を突いた攻撃でした。TCPには成りすましを防止するためにお互いの所在が確認できた時点で通信を開始するという仕組みがあります。この確認作業を﹁3ウェイ・ハンドシェイク﹂といいます。3ウェイ・ハンドシェイクの仕組み
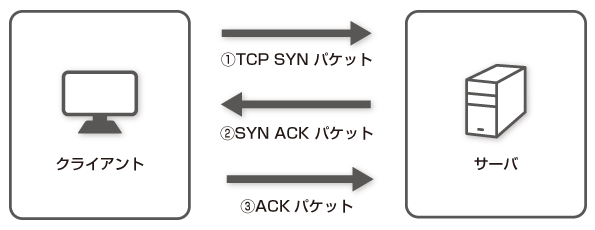
1.クライアントからサーバへTCP SYN パケットを送信。
2.TCP SYN パケットを受け取ったサーバはクライアントへSYN ACK パケットを送信。
3.SYN ACK パケットを受け取ったクライアントはACKパケットを送信して通信を開始します。
3ウェイ・ハンドシェイクを利用した攻撃方法
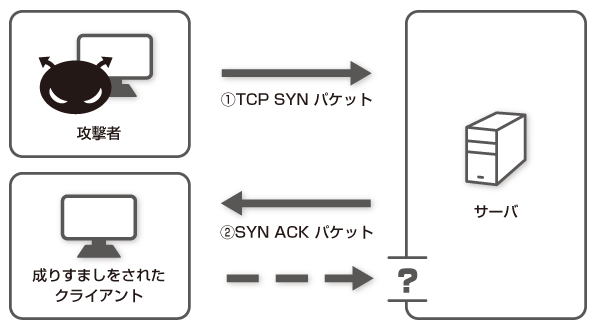
1.攻撃者は成りすましを行い、サーバへ大量のTCP SYN パケットを送信。
2.サーバは相手の正当性を確認するためにSYN ACK パケットを送信。しかし成りすましを行っているため、ACKパケットは帰ってきません。
3.サーバ側は相手からACKパケットが送信されるのを待つことになります。
同時に接続待ちできる数は決まっているため、通常のクライアントは順番待ちの状態になります。
また悪いことに﹁ACKパケットを送ってくるはずの相手﹂の情報はメモリ上に保存されます。大量のIPアドレスからTCP SYN パケットを送られて、ACKパケット待ちのIPが増えると、それだけ消費メモリも多くなります。理論的には1Gbpsの帯域で、1秒間に30MBほどのメモリを消費させることが可能とのことです。
以上で各種攻撃方法の解説と、iptablesの設定について解説でした。
正しく設定できているかチェックするには以下のコマンドで確認します。
﹁-L﹂が設定の書き出しで、﹁-n﹂が名前解決をしないオプションです。設定が長くなることもあるので﹁iptables﹂というファイルに書き出しています。
接続の確率待ちIPを記憶しておく最大数は「/etc/sysctl.conf」の「net.ipv4.tcp_max_syn_backlog」という値で管理されています。
とくに「tcp_max_syn_backlog」が設定されておらず、メモリが128MB以上ある場合は自動で1024に設定されています。ほとんどの場合、この設定で問題ないはずです。

ちなみに設定通りに1024までACKパケット待ちをしてくれるかというと、実際には769しか待ってくれないようです。
実効値 = ( 設定値*0.75 ) + 1
大規模なサイトを運営している場合は環境に合わせた値を設定してください。

何か決めなきゃ駄目ですか。より
SYN cookiesで対策
SYN cookies︵スィン・クッキーズ︶とはSYN flood攻撃の対策として考えられた仕組みです。 3ウェイ・ハンドシェイクの際に相手の情報をメモリ上に保存するのではなく、サーバから送信するSYN ACK パケットにcookiesとして付与します。 またACKパケットに正常なcookieが添付されているのを確認してから接続を確立するため、ACKパケット待ちになることはありません。 つまりメモリの枯渇とACKパケット待ちという2つの問題を同時に解決することができます。この対策はSYN flood攻撃に対して有効なため、最近のLinuxカーネルではデフォルトで有効になっています。 cookiesの作成や確認のために多少応答速度は低下しますが、最近の高性能なCPUなのであまり神経質になる必要はありません。 Smurf攻撃と同じようにシェルスクリプトで自動的に有効にします。# SYN flood攻撃対策でSYN cookiesを有効に設定 sysctl -w net.ipv4.tcp_syncookies=1 > /dev/null sed -i '/# Enable SYN Cookie/d' /etc/sysctl.conf sed -i '/net.ipv4.tcp_syncookies/d' /etc/sysctl.conf echo "# Enable SYN Cookie" >> /etc/sysctl.conf echo "net.ipv4.tcp_syncookies=1" >> /etc/sysctl.conf
ユーザー認証に使うAuth/IDENT用の113番ポートを拒否
113番ポートはAuth/IDENT用のポートです。Sendmail等で認証の際にこのポートを使います。Sendmailは113ポートにアクセスして何の反応もないと、ビジー状態を想定して所定の回数アクセスを試みます。 そこで﹁DROP︵破棄︶﹂ではなく、意図的に﹁REJECT︵拒否︶﹂に設定します。こうすると拒否されたSendmailはすぐに別の手段︵SMTP︶で認証を行うため、結果的にメールの応答が早くなります。 ﹁こちらのサイト﹂で詳しく解説されています。# Auth/IDENT用の113番ポートは拒否 iptables -A INPUT -p tcp --dport 113 -j REJECT --reject-with tcp-reset﹁--reject-with﹂オプションで﹁tcp-reset﹂を指定しているので、TCP RSTパケットを返答をします。TCP RSTパケットとは、TCPで接続を中断・拒否する際に送られるパケットです。
拒否IPリストに記載されたIPからのアクセスを拒否する
サーバを公開している以上、ブルートフォース攻撃やDos攻撃は止みません。そうしたIPのリストをログファイルなどから動的に作成してiptablesで遮断することができます。 ここではリストにあるIPを拒否する方法を解説します。動的な拒否IPリストの作成方法はそれぞれのソフトのマニュアルを参照してください。# 拒否IPリストに記載されたIPからのアクセスを拒否する if [ -s /root/deny_ip ]; then for ip in `cat /root/deny_ip` do iptables -I INPUT -s $ip -j DROP done fi1行目で﹁if [ -s /root/deny_ip ]﹂で﹁/root/deny_ip﹂というファイルが存在するか調べています。 2行目で﹁/root/deny_ip﹂のリストを変数﹁ip﹂に代入。﹁for do done﹂でループ処理をしています。 4行目﹁iptables -I INPUT -s $ip -j DROP﹂という形式でリストのIPを1行ずつ書き出しています。﹁-I INPUT﹂の後に追加する番号を指定していないのでリストの先頭から﹁filterテーブルのINPUTの1番﹂に追加されます。︵リストの最終行が1番になる︶ 最後﹁fi﹂で閉じています。
最新の国別IP割り当てリストを取得して、特定の国からのアクセスを許可
ほとんどの攻撃は特定の国からされます。そのため特定の国からのアクセスを拒否することで攻撃される危険性を大幅に低くすることができます。 またSSHでのアクセスなど、国内からの利用に限定されるサービスの場合は、日本からのアクセスのみ許可するという方法も可能です。最新リストの取得、リストから成形など、はじめてシェルスクリプトに触れる方にとっては敷居が高いと思いますが、効果の高い対策なので挑戦してみてください。 各国のIPリストの取得には﹁世界の国別 IPv4 アドレス割り当てリスト﹂を利用させていただきます。こちらではIPブロックに利用しやすいよう成形して提供してくれています。 それぞれの国のカントリーコードは﹁国/地域別IPアドレス割り当てリスト﹂で確認できます。世界の国別 IPv4 割り当てリストを毎日ダウンロードして最新の状態に保つ
IPの割り当ては頻繁に変更されるため、上記のリストは毎日更新されています。それに合わせて毎日IPリストを取得して最新の状態にします。 サーバがビジー状態など、リストが正常に取得できないこともあるため、その際の対策も同時にします。︵日本からのみ許可という設定をしていた場合、JPのIPがリストに見つからないと、全てのアクセスを拒否してしまうため。︶ まずcronで毎日実行するために﹁/etc/cron.daily/﹂に﹁iplist_check.sh﹂というシェルスクリプトを作成します。# vi /etc/cron.daily/iplist_check.sh
つづいておまじないと、パスを通します。︵cronはBashの環境変数と共有してないので、コマンドの正確な場所を教える必要があります。︶
#!/bin/bash
PATH=/usr/local/sbin:/usr/local/bin:/sbin:/bin:/usr/sbin:/usr/bin

# ファイルの取得
wget -q http://nami.jp/ipv4bycc/cidr.txt.gz -P /tmp

# 解凍してリネーム
gunzip -q -f -c /tmp/cidr.txt.gz > /tmp/iplist.new
# /tmp下なので240時間で自動的に削除されますが、念のため削除
rm -f /tmp/cidr.txt.gz

# iplistが存在しているかチェック
if [ -s /tmp/iplist ]; then

 # diffでエラーが出るので実行権限の変更。「-f」を付けて初回にファイルがない場合に対応
 chmod -f 700 iplist.new
 chmod -f 700 iplist

 # 差分チェック(正常にファイルが取得できたかチェック)
 # grep -c パターンに一致した行の行数のみを出力する。diffで差分(違い)のある行は「< hoge」と表示されるため、行頭に「<」がある行をカウントしている。「=」の前後にスペースがあると正常に代入できないので注意。
 # $()の中に記述しているので、変数ipdiffに代入。
 ipdiff=$(diff /tmp/iplist /tmp/iplist.new  | grep -c "^<")

 # 上記が存在していて、差分の数が1000行以上の場合
 # (通常考えられない量の変更=ファイルが正常に取得できていないと判断)
 if [ $ipdiff -gt 1000 ]; then
  # メールでIPリストが正常に取得できなかった由を伝える。
  cat <<EOM | mail -s "iplist_check" info@example.com
   iplist false
EOM
  # 正常に取得できなかったリストを破棄
  rm -f /tmp/iplist.new
 else
  # 正常に取得できた場合ファイル名をiplistに変更
  mv /tmp/iplist.new /tmp/iplist

  # 新しく取得したリストでiptablesの設定スクリプトを実行
  sh /usr/script/iptables.sh > /dev/null
 fi
else
 # 初回実行時は差分をチェックすべきバックアップがないのでそのままファイル名を変更して利用
 mv /tmp/iplist.new /tmp/iplist

 # 新しく取得したリストでiptablesの設定スクリプトを実行
 sh /usr/script/iptables.sh > /dev/null
fi
このファイルの中でいま作成中のiptables.shを実行させます。
iptables.shは﹁/usr/script/﹂に保存することにしました。ファイルパスは好きな場所に変更してください。
最後に作成したに実行権限を与えます。
# chmod 755 /etc/cron.daily/iplist_check.sh
特定の国からのアクセスを許可する
上記の﹁iplist_check.sh﹂でIPのリスト﹁iplist﹂を取得できたので、さっそく利用して﹁iptables.sh﹂で日本からのみアクセスを許可します。# 特定の国からのアクセスを許可する if [ -s /tmp/iplist ]; then iptables -N ACCEPT_JP_FILTER sed -n 's/^JP\t//p' /tmp/iplist | while read address; do iptables -A ACCEPT_JP_FILTER -s $address -j ACCEPT done fi1行目﹁if [ -s /tmp/iplist ]﹂でファイルが存在することを確認して 2行目﹁-N﹂オプションで新しいユーザー定義チェイン﹁ACCEPT_JP_FILTER﹂を作成。 3行目﹁sed -n ‘s/^JP\t//p’﹂で﹁s﹂オプションで置換。行頭が﹁JP﹂続いて﹁タブ﹂の部分を削除︵//︶。﹁p﹂オプションなので置換した行を出力。 ﹁while read address﹂で変数﹁address﹂に代入。 5行目で﹁ACCEPT_JP_FILTER﹂に許可するIPを登録してACCEPTで許可。 この設定により行頭がJPで始まる行のIPを書き出すことができる。
例︶このような行が自動で書き出される
iptables -A ACCEPT_JP_FILTER -s 223.223.224.0/19 -j ACCEPTこのチェインを設定後、日本からのアクセスのみ開放したいポートに﹁ACCEPT﹂の代わりに﹁ACCEPT_JP_FILTER﹂を使用します。
例︶Webサーバ用にポート80を日本からのアクセスのみ許可
iptables -A INPUT -p tcp --dport 80 -j ACCEPT_JP_FILTER複数の国を指定する際は4行目を以下のようにして指定してください。︵bashでカッコやパイプを利用する際は\でエスケープする必要があります。︶
例︶日本︵JP︶とアメリカ︵US︶のIPを抜き出す場合。
sed -n 's/^\(JP\|US\)\t//p' /tmp/iplist | while read address;この例では日本のみ許可しているので﹁ACCEPT_JP_FILTER﹂という名前のチェインを作成していますが、複数の国を許可する場合は﹁ACCEPT_FILTERやACCEPT_COUNTRY_FILTER﹂など把握しやすいように名前を変えてください。
リストを利用して、特定の国からのアクセスを拒否
基本的な仕組みは、上記の特定の国からのアクセスを許可する方法と同じです。拒否する国のカントリーコードを指定してください。 今回の例では2012年ボットネット攻撃源国トップ5からのアクセスを拒否する方法です。中国55.44%、ドイツ9.07%、インド8.77%、エジプト5.73%、パキスタン4.26%となっています。 ※ドイツはソフトのよってはアップデート等で利用することがあるので、除外しました。 プロレクシック・テクノロジーズ社の「2012年第3四半期DDoS攻撃レポート(pdfファイルです)」より。
# 特定の国からのアクセスを拒否する if [ -s /tmp/iplist ]; then iptables -N DROP_COUNTRY_FILTER sed -n 's/^\(CN\|IN\|EG\|PK\)\t//p' /tmp/iplist | while read address; do iptables -A DROP_COUNTRY_FILTER -s $address -j DROP done iptables -A INPUT -j DROP_COUNTRY_FILTER fi許可する場合は、許可するポートに作成したチェインを指定しましたが、今回は特定のIPアドレスを拒否するため、開放するポートよりも上に記述してください。
例︶IP0.0.0.0からのアクセスを破棄した後に、ポート80へのアクセスを許可。︵逆だと破棄できない︶
iptables -N DROP_COUNTRY_FILTER
iptables -A DROP_COUNTRY_FILTER -s 0.0.0.0 -j DROP
iptables -A INPUT -j DROP_COUNTRY_FILTER
iptables -A INPUT -p tcp --dport 80 -j ACCEPT
ステートフル・パケットインスペクションを利用する
ステートフル・パケットインスペクションとは簡単に言うと通信を動的に判断する方法です。 考えだされた背景にはTCPの3ハンドシェイクが持つ問題があります。 すでに解説しましたが、TCPは3ハンドシェイクという方式で相手を確認します。 SYN flood攻撃の際は、接続待ちの状態を解消するためにSYN cookiesで対策しました。TCPにはもうひとつ﹁ACKフラグを偽造したパケットを送信されると無条件で許可してしまう﹂という弱点があります。 そこで考えだされたのがステートフル・パケットインスペクションです。正しい手順でTCPセッションを確立した場合、ステータス,プロトコルなどの情報をステート・テーブルと呼ばれる場所に保存します。その情報と一致しない﹁ACKフラグ﹂を持った通信は、正しい手順で確立された接続ではないので破棄するといった動的な判断が可能になります。 このステートフル・パケットインスペクションはファイアウォールの機能なので、TCPだけでなく、本来ステートレスなUDPに対しても有効です。︵DNSやPingなど戻りの通信を必要とするものなど︶また、iptablesだけでは実現できませんが、ステートテーブルにはパケットに関する情報だけでなく、アプリケーションレベルの情報も保存することができるため、通信の整合性をより強固に取ることができます。︵ウェブアプリケーションファイアウォールのようなもの︶ 更に詳しく知りたい方は﹁こちらのサイト﹂で詳しく解説されています。# ステートフル・パケットインスペクションで正しいTCPと既に許可された接続を許可 iptables -A INPUT -p tcp ! --tcp-flags SYN,RST,ACK SYN -m state --state NEW -j DROP iptables -A INPUT -m state --state ESTABLISHED,RELATED -j ACCEPT2行目﹁--tcp-flags SYN,RST,ACK SYN﹂で監視するフラグを﹁SYN、RST、ACK﹂のうち﹁SYN﹂の接続。先頭に﹁!﹂が付いているので否定になります。 ﹁-m state﹂でstate拡張を呼び出し。 ﹁--state NEW﹂で新規の接続を指定。 ﹁-j DROP﹂でターゲットを破棄しています。 つまりTCP接続の内、新規の接続にも関わらずSYNフラグを持っていない接続は破棄。という設定です。 3行目﹁-m state﹂でstate拡張を呼び出し。 ﹁--state ESTABLISHED﹂で既に許可された接続を指定。 ﹁RELATED﹂で新参ではあるが許可された接続を指定。 ﹁-j ACCEPT﹂でターゲットを許可しています。 パラメータについては﹁前のページ﹂で解説しました。
例︶TCPの受信パケットの内、新規の接続を破棄
iptables -A INPUT -p tcp -m state --state NEW -j DROP
例︶TCPの受信パケットの内、ポート80への新規の接続を許可
iptables -A INPUT -p tcp -m state --state NEW --dport 80 -j ACCEPT
個別のサービスで利用するポートを開放する
いよいよ通信を許可するポートについて設定をしていきます。ここで大切なことは、本当にそのポートを開放する必要があるのかを見極めることです。それぞれのサービスで利用するポートについて把握して、必要のないポートを開けないようにしてください。 それぞれのサービスが使用しているポートを調べたい場合は以下のコマンドで確認してください。# netstat -anp
以下のように表示されるはずです。これでわかるのはポート53をプログラムnamedが使用しているということです。StateのLISTENは接続待ちの状態。ESTABLISHEDは接続が確立している状態です。
Proto Recv-Q Send-Q Local Address               Foreign Address             State       PID/Program name
tcp        0      0 127.0.0.1:53                0.0.0.0:*                   LISTEN      1121/named
lo︵ループバックインターフェース︶の許可
ループバックインターフェースとは仮想的に内部で使うネットワークのことで、機器が正常に動作しているかや、ネットワークのテストの際に使われます。内部で完結する通信なので全て許可します。## ここから個別のサービスで利用するポートを開放する ## # lo(ループバックインターフェース)の許可 iptables -A INPUT -i lo -j ACCEPT iptables -A OUTPUT -o lo -j ACCEPT﹁-i lo﹂でインプットインターフェイスのループバックインターフェースを指定。 ﹁-o lo﹂でアウトプットインターフェイスのループバックインターフェースを指定。 アウトプットは全て許可にしているので無くても構いませんが、一応明示してあります。
SSH用のポートを日本からのみ許可
SSHは通常ポート22を利用しますが、攻撃者はそれを利用してポート22へブルートフォース攻撃を仕掛けてきます。鍵認証など、適切な対策をしていれば不正アクセスは防げますが、大量のアクセスがあれば、無駄にリソースを消費します。 そこでSSH用のポートを変更して許可します。SSHのポート変更方法は以前の投稿﹁SSH用のポートを変更﹂を御覧ください。 解説ページと合わせてこのページではSSH用のポートを﹁42424﹂とします。 またそのほとんどが海外からの攻撃なので、上で作ったACCEPT_JP_FILTERを利用して日本からのみ接続を許可します。# SSH用のポートを日本からのみ許可 iptables -A INPUT -p tcp -m state --state NEW --dport 42424 -j ACCEPT_JP_FILTER #ポートは自分の環境に合わせてください﹁-p tcp﹂でTCPを指定。 ﹁-m state﹂でステート拡張を読み込みます。 ﹁--state NEW﹂で全くの新規の接続を指定。 ﹁--dport 42424﹂で42424を指定。 ﹁-j ACCEPT_JP_FILTER﹂でターゲットを日本からのアクセスのみ許可。︵上記のACCEPT_JP_FILTERを正しく設定していることが前提となります。︶ このようにポートを変更すれば、ほとんどの場合ブルートフォース攻撃は防げます。 それでも執拗に攻撃を仕掛けられている場合は、以下のようにハッシュリミットを使って攻撃を防いでください。
例︶ハッシュリミットを有効にする場合
iptables -A INPUT -p tcp -m state --state NEW --dport 42424 -m hashlimit --hashlimit-burst 5 --hashlimit 1/h --hashlimit-mode srcip --hashlimit-htable-expire 3600000 --hashlimit-name ssh-limit -j ACCEPT_JP_FILTER﹁-m hashlimit﹂でハッシュリミットを読み込み。 ﹁--hashlimit-burst 5﹂で5回位上のアクセスで制限が発動。 ﹁--hashlimit 1/h﹂で1時間に1度許可。︵1時間経つごとに1つリミットが解除され5時間経つと再び5回までアクセスできる︶ ﹁--hashlimit-mode srcip﹂でIPを元に規制をかける。 ﹁--hashlimit-htable-expire 18000000﹂でIPごとの管理を5時間有効。 ﹁--hashlimit-name ssh-limit﹂でリミットの名前をssh-limitに指定。 この設定では1時間に5回以上新規の接続を行うと、正しい管理者であっても有効になるため、しきい値には注意が必要です。 その他にも、ISPのIPアドレスの範囲を調べてホワイトリストを作成する方法もあります。 詳しくは﹁ロリポップ!から﹁不正なアクセスを検知いたしました﹂というメールが届いた﹂をご覧ください。
http用のポート許可
通常であれば以下の設定で十分です。 F5攻撃など単純なDos攻撃が確認された場合は、上記のハッシュリミット等を導入してください。しかし、通常の利用者が閲覧できない状態になってしまっては攻撃者の目的を助けるだけです。Webサーバの運用に問題ないレベルの攻撃に関しては受け入れるといった柔軟な対応が必要です。# http用のポート許可 iptables -A INPUT -p tcp -m state --state NEW --dport 80 -j ACCEPT
2014年8月追記
本来であれば上のように設定したいところですが、このままだとクライアントから通信の終了を知らせるACK,FINパケットが破棄されることがあります。 原因には諸説あり、携帯電話でのアクセスの際に、データの通信から時間が開くことが原因ではないかとの情報、またクライアント側のファイアーウォールが原因との情報もあり、正確な理由は判然としません。 データ通信事態は終了した後の事なので実害はありませんが、クライアント側はACKパケットを待つことになり、ログも汚れるのでステートフルパケットインスペクションは利用しないことにします。# http用のポート許可 iptables -A INPUT -p tcp --dport 80 -j ACCEPT
DNS用のポート許可
DNSは最も攻撃されやすいポートです。最近は特にDNS Amp攻撃が頻繁です。対策を立てるためにもログを取っておきましょう。 DNS Amp攻撃の対策については過去の投稿﹁DNS Amp攻撃の解説と、踏み台にされないためのBIND DNSの設定﹂を参照してください。 SSH用ポートの設定で解説したとおり、hashlimitモジュールを利用すればIPごとに時間あたりのアクセス数を集計しアクセスを規制することができます。 DNS Ampの攻撃者もその辺は心得たもので、一定期間ごとに成りすましのIPを変えてアクセスしてきます。 そうなるとIPごとにかけられた制限が解除されてしまい、再びリミットまではアクセス規制がかからなくなります。 そこで攻撃の意思を持ったアクセスをログに書き出して管理することにします。 そのログをSwatch等のログ監視ツールを利用して拒否IPリストに書き出せば、リミットまでカウントすること無く当該IPによるアクセスを完全に遮断することができます。 ︵hashlimit-htable-expireの調整でも対応できますが、そのへんはサーバのセキュリティポリシーに合わせて設定してください。解説的に様々な例があったほうが良いのではないか、ということでrecentを利用した例も解説しておきます。︶# DNS用ポートの許可。DNS Amp攻撃は適宜ログを取る iptables -N DNSAMP iptables -A DNSAMP -m recent --name dnsamp --set iptables -A DNSAMP -m recent --name dnsamp --rcheck --seconds 60 --hitcount 5 -j LOG --log-prefix "[IPTABLES DNSAMP] : " --log-level=debug iptables -A DNSAMP -m recent --name dnsamp --rcheck --seconds 60 --hitcount 5 -j DROP iptables -A DNSAMP -j ACCEPT iptables -A INPUT -p udp -m state --state NEW --dport 53 -i eth0 -j DNSAMPチェインの仕組みは上で解説しているので省略します。 3行目、﹁-m recent﹂でrecentモジュールを読み込み、﹁--name dnsamp --set﹂でdnsampという名前のリストを作成、IPを記載する。 4行目、dnsampリストを参照し、60秒に5回以上アクセスがあった場合ログに記載。 5行目、ログに記載された通信を遮断。 6行目、それ以外の通信を許可。 続いてポート53のTCPを許可。通常DNSはUDPで名前解決しますが、セカンダリネームサーバへのゾーン転送や512オクテットを超えるサイズの場合に使われるため設定する必要があります。 ︵こちらはUDPのように成りすましができないのでDNS Ampに使われることは無いためログに書き出す必要はありません。︶
iptables -A INPUT -p tcp -m state --state NEW --dport 53 -j ACCEPT
smtps用にポートを許可
メールサーバで利用するポート465を許可。# smtps用にポートを許可 iptables -A INPUT -p tcp -m state --state NEW --dport 465 -j ACCEPT
imaps(pop3 protocol over TLS/SSL)用にポートを許可
メールサーバで利用するポート993を許可。# imaps(pop3 protocol over TLS/SSL)用にポートを許可 iptables -A INPUT -p tcp -m state --state NEW --dport 993 -j ACCEPT
pop3s(imap4 protocol over TLS/SSL)用にポートを許可
メールサーバで利用するポート995を許可。# pop3s(imap4 protocol over TLS/SSL)用にポートを許可 iptables -A INPUT -p tcp -m state --state NEW --dport 995 -j ACCEPT
smtp tcp用にポートを許可
外部とのメールのやり取りはTLSを利用しますが、内部のメール処理に利用するため。同じくUDPも使うため許可。# smtp tcp用にポートを許可 iptables -A INPUT -p tcp -m state --state NEW --dport 25 -j ACCEPT iptables -A INPUT -p udp -m state --state NEW --dport 25 -j ACCEPT
サブミッションポート用にポートを許可
こちらもメールで使うため許可。# サブミッションポート用にポートを許可 iptables -A INPUT -p tcp -m state --state NEW --dport 587 -j ACCEPT
https(http protocol over TLS/SSL) tcp用にポートを許可
Webサーバで暗号化通信を利用する場合に許可。# https(http protocol over TLS/SSL) tcp用にポートを許可 iptables -A INPUT -p tcp -m state --state NEW --dport 443 -j ACCEPT
webmin用のポートを許可
個人的はよく利用するWebmin用にポート開放。ユーザー認証があるためACCEPT_JP_FILTERで日本からのみ許可。またwebminではコマンドも利用するためudpも許可する。 さらにハッシュリミットでブルートフォース攻撃対策…と、いきたいところですが、ハッシュリミットを有効にすると正常にログインできませんでした。それよりもwebminの設定ファイル﹁/etc/webmin/miniserv.conf﹂でポート番号を変更したほうが安全性はずっと高まります。 port=10000︵TCP︶とlisten=10000︵UDP︶を変更します。この例では10000から10022へ変更しています。# webmin用のポートを許可 iptables -A INPUT -p tcp -m state --state NEW --dport 10022 -j ACCEPT_JP_FILTER iptables -A INPUT -p udp -m state --state NEW --dport 10022 -j ACCEPT_JP_FILTERこの他にもサービスで利用するポートを適宜許可してください。
上記の条件に当てはまらない通信を記録して破棄
上記の条件に当てはまらない通信は、サービスを提供していないポートへのアクセスということになります。攻撃の端緒を探る貴重なデータなのでログとして収集してから破棄します。# 上記の条件に当てはまらない通信を記録して破棄 iptables -A INPUT -m limit --limit 1/s -j LOG --log-prefix "[IPTABLES DROP INPUT] : " --log-level=debug iptables -A INPUT -j DROP今回は﹁--log-prefix “[IPTABLES DROP INPUT] : “﹂で接頭辞を﹁[IPTABLES DROP INPUT] : ﹂としました。
設定を保存してiptablesを起動
最後に設定を保存して、iptablesを起動します。# 設定を保存してiptablesを起動 /etc/rc.d/init.d/iptables save /etc/rc.d/init.d/iptables start以上でiptables.shの編集は終了です。viで保存して終了してください。
最後に作成したシェルスクリプトを実行
作成したシェルスクリプトを実行して有効にします。
# sh iptables.sh
このスクリプトの実行はIPリストを毎日取得する﹁iplist_check.sh﹂に書いたので、特別指定する必要はありません。
﹁iplist_check.sh﹂で書いた場所に﹁iptables.sh﹂を移動させます。
# mkdir /usr/script/ # cp iptables.sh /usr/script/iptables.sh # chmod 755 /usr/script/iptables.sh ←実行権限を与えるこれで、﹁iplist_check.sh﹂が実行される度に﹁iptables.sh﹂も実行されるようになります。 定義には多少時間もCPUも使うので週一度の実行にしたいという場合は﹁iplist_check.sh﹂を﹁/etc/cron.weekly﹂に保存、実行権限を与えるだけです。
# iptables -nL >> iptables
# vi iptables
参考として、このページで解説した対策をまとめた﹁iptables.sh﹂を残しておきます。コピーペーストせずに、必要な対策だけ取り入れるようにしてください。
クリックすると表示されます。
#!/bin/bash PATH=/usr/local/sbin:/usr/local/bin:/sbin:/bin:/usr/sbin:/usr/bin /etc/rc.d/init.d/iptables stop # ポリシーの設定 iptables -P INPUT DROP iptables -P OUTPUT ACCEPT iptables -P FORWARD DROP # IP Spoofing攻撃対策 iptables -A INPUT -i eth0 -s 127.0.0.1/8 -j DROP iptables -A INPUT -i eth0 -s 10.0.0.0/8 -j DROP iptables -A INPUT -i eth0 -s 172.16.0.0/12 -j DROP iptables -A INPUT -i eth0 -s 192.168.0.0/16 -j DROP iptables -A INPUT -i eth0 -s 192.168.0.0/24 -j DROP # Ping攻撃対策 iptables -N PING_ATTACK # Ping攻撃対策 + Ping Flood攻撃対策 iptables -A PING_ATTACK -m length --length :85 -m limit --limit 1/s --limit-burst 4 -j ACCEPT iptables -A PING_ATTACK -j LOG --log-prefix "[IPTABLES PINGATTACK] : " --log-level=debug iptables -A PING_ATTACK -j DROP iptables -A INPUT -p icmp --icmp-type 8 -j PING_ATTACK # Smurf攻撃対策+不要ログ破棄 iptables -A INPUT -d 255.255.255.255 -j DROP iptables -A INPUT -d 224.0.0.1 -j DROP iptables -A INPUT -d 192.168.0.255 -j DROP # Smurf攻撃対策 sysctl -w net.ipv4.icmp_echo_ignore_broadcasts=1 > /dev/null sed -i '/# Disable Broadcast Ping/d' /etc/sysctl.conf sed -i '/net.ipv4.icmp_echo_ignore_broadcasts/d' /etc/sysctl.conf echo "# Disable Broadcast Ping" >> /etc/sysctl.conf echo "net.ipv4.icmp_echo_ignore_broadcasts=1" >> /etc/sysctl.conf # SYN flood攻撃対策でSYN cookiesを有効に設定 sysctl -w net.ipv4.tcp_syncookies=1 > /dev/null sed -i '/# Enable SYN Cookie/d' /etc/sysctl.conf sed -i '/net.ipv4.tcp_syncookies/d' /etc/sysctl.conf echo "# Enable SYN Cookie" >> /etc/sysctl.conf echo "net.ipv4.tcp_syncookies=1" >> /etc/sysctl.conf # Auth/IDENT用の113番ポートは拒否 iptables -A INPUT -p tcp --dport 113 -i eth0 -j REJECT --reject-with tcp-reset # 拒否IPリストに記載されたIPを拒否する if [ -s /root/deny_ip ]; then for ip in `cat /root/deny_ip` do iptables -I INPUT -s $ip -j DROP done fi # 特定の国からのアクセスを許可する if [ -s /tmp/iplist ]; then iptables -N ACCEPT_JP_FILTER sed -n 's/^JP\t//p' /tmp/iplist | while read address; do iptables -A ACCEPT_JP_FILTER -s $address -j ACCEPT done fi # 特定の国からのアクセスを拒否する if [ -s /tmp/iplist ]; then iptables -N DROP_COUNTRY_FILTER sed -n 's/^\(CN\|IN\|EG\|PK\)\t//p' /tmp/iplist | while read address; do iptables -A DROP_COUNTRY_FILTER -s $address -j DROP done iptables -A INPUT -j DROP_COUNTRY_FILTER fi # ステートフル・パケットインスペクションで正しいTCPと既に許可された接続を許可 iptables -A INPUT -p tcp ! --tcp-flags SYN,RST,ACK SYN -m state --state NEW -j DROP iptables -A INPUT -m state --state ESTABLISHED,RELATED -j ACCEPT ## ここから個別のサービスで利用するポートを開放する ## # lo(ループバックインターフェース)の許可 iptables -A INPUT -i lo -j ACCEPT iptables -A OUTPUT -o lo -j ACCEPT # SSH用のポートを日本からのみ許可 iptables -A INPUT -p tcp -m state --state NEW --dport 424242 -m hashlimit --hashlimit-burst 10 --hashlimit 1/h --hashlimit-mode srcip --hashlimit-htable-expire 3600000 --hashlimit-name ssh-limit -j ACCEPT_JP_FILTER # http用のポート許可 # iptables -A INPUT -p tcp -m state --state NEW --dport 80 -j ACCEPT iptables -A INPUT -p tcp --dport 80 -j ACCEPT # DNS用ポートの許可。DNS Amp攻撃は適宜ログを取る iptables -N DNSAMP iptables -A DNSAMP -m recent --name dnsamp --set iptables -A DNSAMP -m recent --name dnsamp --rcheck --seconds 60 --hitcount 5 -j LOG --log-prefix "[IPTABLES DNSAMP] : " --log-level=debug iptables -A DNSAMP -m recent --name dnsamp --rcheck --seconds 60 --hitcount 5 -j DROP iptables -A DNSAMP -j ACCEPT iptables -A INPUT -p udp -m state --state NEW --dport 53 -i eth0 -j DNSAMP iptables -A INPUT -p tcp -m state --state NEW --dport 53 -j ACCEPT # smtps用にポートを許可 iptables -A INPUT -p tcp -m state --state NEW --dport 465 -j ACCEPT # imaps(pop3 protocol over TLS/SSL)用にポートを許可 iptables -A INPUT -p tcp -m state --state NEW --dport 993 -j ACCEPT # pop3s(imap4 protocol over TLS/SSL)用にポートを許可 iptables -A INPUT -p tcp -m state --state NEW --dport 995 -j ACCEPT # smtp tcp用にポートを許可 iptables -A INPUT -p tcp -m state --state NEW --dport 25 -j ACCEPT # サブミッションポート用にポートを許可 iptables -A INPUT -p tcp -m state --state NEW --dport 587 -j ACCEPT # https(http protocol over TLS/SSL) tcp用にポートを許可 iptables -A INPUT -p tcp -m state --state NEW --dport 443 -j ACCEPT # webmin用のポートを許可 iptables -A INPUT -p tcp -m state --state NEW --dport 10022 -j ACCEPT_JP_FILTER iptables -A INPUT -p udp -m state --state NEW --dport 10022 -j ACCEPT_JP_FILTER # 上記の条件に当てはまらない通信を記録して破棄 iptables -A INPUT -m limit --limit 1/s -j LOG --log-prefix "[IPTABLES DROP INPUT] : " --log-level=debug iptables -A INPUT -j DROP # 設定を保存してiptablesを起動 /etc/rc.d/init.d/iptables save /etc/rc.d/init.d/iptables start次回はパケットフィルタリングが正しく動作しているかチェックする方法を解説します。
 iptablesをシェルスクリプトで設定していて動作が遅い場合の対処法
 iptablesの設定とログファイルのローテーション
 コピペから脱出!iptablesの仕組みを理解して環境に合わせた設定をしよう
 iptablesで設定したパケットフィルタリングが正しく動作しているかテスト
 rsyslogを利用したログファイル作成と、logrotateを利用したログのローテーション
 Dovecot IMAP/POP3 Serverで受信用メールサーバを構築
 Nginxで特定の国のIPだけを許可する方法


非常にわかりやすく丁寧な記事です。
ありがとうございます。
コメントありがとうございます。
メモも兼ねているため長い投稿になってしまいましたが、参考になれば幸いです。
素晴らしい記事です。ありがとうございます。
ご丁寧にコメントありがとうございます。
すごく役に立つ記事で重宝しています。
ところで
iptables -F DROP_COUNTRY_FILTER
2行目「-F」オプションで新しいユーザー定義チェイン「ACCEPT_JP_FILTER」を作成。
の2か所の文ですが、-Fではなく共に-Nではありませんか?