

This article needs additional citations for verification. Please help improve this articlebyadding citations to reliable sources. Unsourced material may be challenged and removed.
Find sources: "Engineering drawing" – news · newspapers · books · scholar · JSTOR (September 2009) (Learn how and when to remove this message) |
| Part of series on |
| Technical drawings |
|---|
 |
|
By field |
|
Types |
|
|
|
Standards
|
|
See also |
|
|
Anengineering drawing is a type of technical drawing that is used to convey information about an object. A common use is to specify the geometry necessary for the construction of a component and is called a detail drawing. Usually, a number of drawings are necessary to completely specify even a simple component. These drawings are linked together by a "master drawing." This "master drawing" is more commonly known as an assembly drawing. The assembly drawing gives the drawing numbers of the subsequent detailed components, quantities required, construction materials and possibly 3D images that can be used to locate individual items. Although mostly consisting of pictographic representations, abbreviations and symbols are used for brevity and additional textual explanations may also be provided to convey the necessary information.
The process of producing engineering drawings is often referred to as technical drawingordrafting (draughting).[1] Drawings typically contain multiple views of a component, although additional scratch views may be added of details for further explanation. Only the information that is a requirement is typically specified. Key information such as dimensions is usually only specified in one place on a drawing, avoiding redundancy and the possibility of inconsistency. Suitable tolerances are given for critical dimensions to allow the component to be manufactured and function. More detailed production drawings may be produced based on the information given in an engineering drawing. Drawings have an information box or title block containing who drew the drawing, who approved it, units of dimensions, meaning of views, the title of the drawing and the drawing number.
Technical drawing has existed since ancient times. Complex technical drawings were made in renaissance times, such as the drawings of Leonardo da Vinci. Modern engineering drawing, with its precise conventions of orthographic projection and scale, arose in France at a time when the Industrial Revolution was in its infancy. L. T. C. Rolt's biography of Isambard Kingdom Brunel[2] says of his father, Marc Isambard Brunel, that "It seems fairly certain that Marc's drawings of his block-making machinery (in 1799) made a contribution to British engineering technique much greater than the machines they represented. For it is safe to assume that he had mastered the art of presenting three-dimensional objects in a two-dimensional plane which we now call mechanical drawing. It had been evolved by Gaspard MongeofMezieresin1765 but had remained a military secret until 1794 and was therefore unknown in England."[2]
Engineering drawings specify the requirements of a component or assembly which can be complicated. Standards provide rules for their specification and interpretation. Standardization also aids internationalization, because people from different countries who speak different languages can read the same engineering drawing, and interpret it the same way.
One major set of engineering drawing standards is ASME Y14.5 and Y14.5M (most recently revised in 2018). These apply widely in the United States, although ISO 8015 (Geometrical product specifications (GPS) — Fundamentals — Concepts, principles and rules) is now also important. In 2018, ASME AED-1 was created to develop advanced practices unique to aerospace and other industries and supplement to Y14.5 Standards.
In 2011, a new revision of ISO 8015 (Geometrical product specifications (GPS) — Fundamentals — Concepts, principles and rules) was published containing the Invocation Principle. This states that, "Once a portion of the ISO geometric product specification (GPS) system is invoked in a mechanical engineering product documentation, the entire ISO GPS system is invoked." It also goes on to state that marking a drawing "Tolerancing ISO 8015" is optional. The implication of this is that any drawing using ISO symbols can only be interpreted to ISO GPS rules. The only way not to invoke the ISO GPS system is to invoke a national or other standard. Britain, BS 8888 (Technical Product Specification) has undergone important updates in the 2010s.
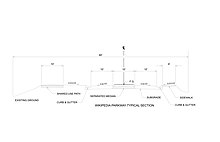
For centuries, until the 1970s, all engineering drawing was done manually by using pencil and pen on paper or other substrate (e.g., vellum, mylar). Since the advent of computer-aided design (CAD), engineering drawing has been done more and more in the electronic medium with each passing decade. Today most engineering drawing is done with CAD, but pencil and paper have not entirely disappeared.
Some of the tools of manual drafting include pencils, pens and their ink, straightedges, T-squares, French curves, triangles, rulers, protractors, dividers, compasses, scales, erasers, and tacks or push pins. (Slide rules used to number among the supplies, too, but nowadays even manual drafting, when it occurs, benefits from a pocket calculator or its onscreen equivalent.) And of course the tools also include drawing boards (drafting boards) or tables. The English idiom "to go back to the drawing board", which is a figurative phrase meaning to rethink something altogether, was inspired by the literal act of discovering design errors during production and returning to a drawing board to revise the engineering drawing. Drafting machines are devices that aid manual drafting by combining drawing boards, straightedges, pantographs, and other tools into one integrated drawing environment. CAD provides their virtual equivalents.
Producing drawings usually involves creating an original that is then reproduced, generating multiple copies to be distributed to the shop floor, vendors, company archives, and so on. The classic reproduction methods involved blue and white appearances (whether white-on-blueorblue-on-white), which is why engineering drawings were long called, and even today are still often called, "blueprints" or "bluelines", even though those terms are anachronistic from a literal perspective, since most copies of engineering drawings today are made by more modern methods (often inkjetorlaser printing) that yield black or multicolour lines on white paper. The more generic term "print" is now in common usage in the U.S. to mean any paper copy of an engineering drawing. In the case of CAD drawings, the original is the CAD file, and the printouts of that file are the "prints".
Almost all engineering drawings (except perhaps reference-only views or initial sketches) communicate not only geometry (shape and location) but also dimensions and tolerances[1] for those characteristics. Several systems of dimensioning and tolerancing have evolved. The simplest dimensioning system just specifies distances between points (such as an object's length or width, or hole center locations). Since the advent of well-developed interchangeable manufacture, these distances have been accompanied by tolerances of the plus-or-minus or min-and-max-limit types. Coordinate dimensioning involves defining all points, lines, planes, and profiles in terms of Cartesian coordinates, with a common origin. Coordinate dimensioning was the sole best option until the post-World War II era saw the development of geometric dimensioning and tolerancing (GD&T), which departs from the limitations of coordinate dimensioning (e.g., rectangular-only tolerance zones, tolerance stacking) to allow the most logical tolerancing of both geometry and dimensions (that is, both form [shapes/locations] and sizes).
Drawings convey the following critical information:

A variety of line styles graphically represent physical objects. Types of lines include the following:
Lines can also be classified by a letter classification in which each line is given a letter.
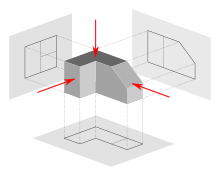


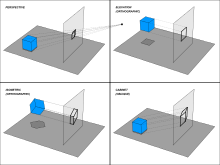
In most cases, a single view is not sufficient to show all necessary features, and several views are used. Types of views include the following:
Amultiview projection is a type of orthographic projection that shows the object as it looks from the front, right, left, top, bottom, or back (e.g. the primary views), and is typically positioned relative to each other according to the rules of either first-angle or third-angle projection. The origin and vector direction of the projectors (also called projection lines) differs, as explained below.
Until the late 19th century, first-angle projection was the norm in North America as well as Europe;[4][5] but circa the 1890s, third-angle projection spread throughout the North American engineering and manufacturing communities to the point of becoming a widely followed convention,[4][5] and it was an ASA standard by the 1950s.[5] Circa World War I, British practice was frequently mixing the use of both projection methods.[4]
As shown above, the determination of what surface constitutes the front, back, top, and bottom varies depending on the projection method used.
Not all views are necessarily used.[6] Generally only as many views are used as are necessary to convey all needed information clearly and economically.[7] The front, top, and right-side views are commonly considered the core group of views included by default,[8] but any combination of views may be used depending on the needs of the particular design. In addition to the six principal views (front, back, top, bottom, right side, left side), any auxiliary views or sections may be included as serve the purposes of part definition and its communication. View lines or section lines (lines with arrows marked "A-A", "B-B", etc.) define the direction and location of viewing or sectioning. Sometimes a note tells the reader in which zone(s) of the drawing to find the view or section.
Anauxiliary view is an orthographic view that is projected into any plane other than one of the six primary views.[9] These views are typically used when an object contains some sort of inclined plane. Using the auxiliary view allows for that inclined plane (and any other significant features) to be projected in their true size and shape. The true size and shape of any feature in an engineering drawing can only be known when the Line of Sight (LOS) is perpendicular to the plane being referenced. It is shown like a three-dimensional object. Auxiliary views tend to make use of axonometric projection. When existing all by themselves, auxiliary views are sometimes known as pictorials.
Anisometric projection shows the object from angles in which the scales along each axis of the object are equal. Isometric projection corresponds to rotation of the object by ± 45° about the vertical axis, followed by rotation of approximately ± 35.264° [= arcsin(tan(30°))] about the horizontal axis starting from an orthographic projection view. "Isometric" comes from the Greek for "same measure". One of the things that makes isometric drawings so attractive is the ease with which 60° angles can be constructed with only a compass and straightedge.
Isometric projection is a type of axonometric projection. The other two types of axonometric projection are:
Anoblique projection is a simple type of graphical projection used for producing pictorial, two-dimensional images of three-dimensional objects:
In both oblique projection and orthographic projection, parallel lines of the source object produce parallel lines in the projected image.
Perspective is an approximate representation on a flat surface, of an image as it is perceived by the eye. The two most characteristic features of perspective are that objects are drawn:
Projected views (either Auxiliary or Multi view) which show a cross section of the source object along the specified cut plane. These views are commonly used to show internal features with more clarity than regular projections or hidden lines, it also helps reducing number of hidden lines.In assembly drawings, hardware components (e.g. nuts, screws, washers) are typically not sectioned. Section view is a half side view of object.
Plans are usually "scale drawings", meaning that the plans are drawn at specific ratio relative to the actual size of the place or object. Various scales may be used for different drawings in a set. For example, a floor plan may be drawn at 1:50 (1:48 or 1⁄4″ = 1′ 0″) whereas a detailed view may be drawn at 1:25 (1:24 or 1⁄2″ = 1′ 0″). Site plans are often drawn at 1:200 or 1:100.
Scale is a nuanced subject in the use of engineering drawings. On one hand, it is a general principle of engineering drawings that they are projected using standardized, mathematically certain projection methods and rules. Thus, great effort is put into having an engineering drawing accurately depict size, shape, form, aspect ratios between features, and so on. And yet, on the other hand, there is another general principle of engineering drawing that nearly diametrically opposes all this effort and intent—that is, the principle that users are not to scale the drawing to infer a dimension not labeled. This stern admonition is often repeated on drawings, via a boilerplate note in the title block telling the user, "DO NOT SCALE DRAWING."
The explanation for why these two nearly opposite principles can coexist is as follows. The first principle—that drawings will be made so carefully and accurately—serves the prime goal of why engineering drawing even exists, which is successfully communicating part definition and acceptance criteria—including "what the part should look like if you've made it correctly." The service of this goal is what creates a drawing that one even could scale and get an accurate dimension thereby. And thus the great temptation to do so, when a dimension is wanted but was not labeled. The second principle—that even though scaling the drawing will usually work, one should nevertheless never do it—serves several goals, such as enforcing total clarity regarding who has authority to discern design intent, and preventing erroneous scaling of a drawing that was never drawn to scale to begin with (which is typically labeled "drawing not to scale" or "scale: NTS"). When a user is forbidden from scaling the drawing, s/he must turn instead to the engineer (for the answers that the scaling would seek), and s/he will never erroneously scale something that is inherently unable to be accurately scaled.
But in some ways, the advent of the CAD and MBD era challenges these assumptions that were formed many decades ago. When part definition is defined mathematically via a solid model, the assertion that one cannot interrogate the model—the direct analog of "scaling the drawing"—becomes ridiculous; because when part definition is defined this way, it is not possible for a drawing or model to be "not to scale". A 2D pencil drawing can be inaccurately foreshortened and skewed (and thus not to scale), yet still be a completely valid part definition as long as the labeled dimensions are the only dimensions used, and no scaling of the drawing by the user occurs. This is because what the drawing and labels convey is in reality a symbol of what is wanted, rather than a true replica of it. (For example, a sketch of a hole that is clearly not round still accurately defines the part as having a true round hole, as long as the label says "10mm DIA", because the "DIA" implicitly but objectively tells the user that the skewed drawn circle is a symbol representing a perfect circle.) But if a mathematical model—essentially, a vector graphic—is declared to be the official definition of the part, then any amount of "scaling the drawing" can make sense; there may still be an error in the model, in the sense that what was intended is not depicted (modeled); but there can be no error of the "not to scale" type—because the mathematical vectors and curves are replicas, not symbols, of the part features.
Even in dealing with 2D drawings, the manufacturing world has changed since the days when people paid attention to the scale ratio claimed on the print, or counted on its accuracy. In the past, prints were plotted on a plotter to exact scale ratios, and the user could know that a line on the drawing 15mm long corresponded to a 30mm part dimension because the drawing said "1:2" in the "scale" box of the title block. Today, in the era of ubiquitous desktop printing, where original drawings or scaled prints are often scanned on a scanner and saved as a PDF file, which is then printed at any percent magnification that the user deems handy (such as "fit to paper size"), users have pretty much given up caring what scale ratio is claimed in the "scale" box of the title block. Which, under the rule of "do not scale drawing", never really did that much for them anyway.
The required sizes of features are conveyed through use of dimensions. Distances may be indicated with either of two standardized forms of dimension: linear and ordinate.
Sizes of circular features are indicated using either diametral or radial dimensions. Radial dimensions use an "R" followed by the value for the radius; Diametral dimensions use a circle with forward-leaning diagonal line through it, called the diameter symbol, followed by the value for the diameter. A radially-aligned line with arrowhead pointing to the circular feature, called a leader, is used in conjunction with both diametral and radial dimensions. All types of dimensions are typically composed of two parts: the nominal value, which is the "ideal" size of the feature, and the tolerance, which specifies the amount that the value may vary above and below the nominal.


Sizes of drawings typically comply with either of two different standards, ISO (World Standard) or ANSI/ASME Y14.1 (American).
The metric drawing sizes correspond to international paper sizes. These developed further refinements in the second half of the twentieth century, when photocopying became cheap. Engineering drawings could be readily doubled (or halved) in size and put on the next larger (or, respectively, smaller) size of paper with no waste of space. And the metric technical pens were chosen in sizes so that one could add detail or drafting changes with a pen width changing by approximately a factor of the square root of 2. A full set of pens would have the following nib sizes: 0.13, 0.18, 0.25, 0.35, 0.5, 0.7, 1.0, 1.5, and 2.0 mm. However, the International Organization for Standardization (ISO) called for four pen widths and set a colour code for each: 0.25 (white), 0.35 (yellow), 0.5 (brown), 0.7 (blue); these nibs produced lines that related to various text character heights and the ISO paper sizes.
All ISO paper sizes have the same aspect ratio, one to the square root of 2, meaning that a document designed for any given size can be enlarged or reduced to any other size and will fit perfectly. Given this ease of changing sizes, it is of course common to copy or print a given document on different sizes of paper, especially within a series, e.g. a drawing on A3 may be enlarged to A2 or reduced to A4.
The U.S. customary "A-size" corresponds to "letter" size, and "B-size" corresponds to "ledger" or "tabloid" size. There were also once British paper sizes, which went by names rather than alphanumeric designations.
American Society of Mechanical Engineers (ASME) ANSI/ASME Y14.1, Y14.2, Y14.3, and Y14.5 are commonly referenced standards in the U.S.
Technical lettering is the process of forming letters, numerals, and other characters in technical drawing. It is used to describe, or provide detailed specifications for an object. With the goals of legibility and uniformity, styles are standardized and lettering ability has little relationship to normal writing ability. Engineering drawings use a Gothic sans-serif script, formed by a series of short strokes. Lower case letters are rare in most drawings of machines. ISO Lettering templates, designed for use with technical pens and pencils, and to suit ISO paper sizes, produce lettering characters to an international standard. The stroke thickness is related to the character height (for example, 2.5mm high characters would have a stroke thickness - pen nib size - of 0.25mm, 3.5 would use a 0.35mm pen and so forth). The ISO character set (font) has a seriffed one, a barred seven, an open four, six, and nine, and a round topped three, that improves legibility when, for example, an A0 drawing has been reduced to A1 or even A3 (and perhaps enlarged back or reproduced/faxed/ microfilmed &c). When CAD drawings became more popular, especially using US American software, such as AutoCAD, the nearest font to this ISO standard font was Romantic Simplex (RomanS) - a proprietary shx font) with a manually adjusted width factor (over ride) to make it look as near to the ISO lettering for the drawing board. However, with the closed four, and arced six and nine, romans.shx typeface could be difficult to read in reductions. In more recent revisions of software packages, the TrueType font ISOCPEUR reliably reproduces the original drawing board lettering stencil style, however, many drawings have switched to the ubiquitous Arial.ttf.
Every engineering drawing must have a title block.[10][11][12]
The title block (T/B, TB) is an area of the drawing that conveys header-type information about the drawing, such as:
ISO 7200 specifies the data fields used in title blocks. It standardizes eight mandatory data fields:[13]
Traditional locations for the title block are the bottom right (most commonly) or the top right or center.
The revisions block (rev block) is a tabulated list of the revisions (versions) of the drawing, documenting the revision control.
Traditional locations for the revisions block are the top right (most commonly) or adjoining the title block in some way.
The next assembly block, often also referred to as "where used" or sometimes "effectivity block", is a list of higher assemblies where the product on the current drawing is used. This block is commonly found adjacent to the title block.
The notes list provides notes to the user of the drawing, conveying any information that the callouts within the field of the drawing did not. It may include general notes, flagnotes, or a mixture of both.
Traditional locations for the notes list are anywhere along the edges of the field of the drawing.
General notes (G/N, GN) apply generally to the contents of the drawing, as opposed to applying only to certain part numbers or certain surfaces or features.
Flagnotes or flag notes (FL, F/N) are notes that apply only where a flagged callout points, such as to particular surfaces, features, or part numbers. Typically the callout includes a flag icon. Some companies call such notes "delta notes", and the note number is enclosed inside a triangular symbol (similar to capital letter delta, Δ). "FL5" (flagnote 5) and "D5" (delta note 5) are typical ways to abbreviate in ASCII-only contexts.
The field of the drawing (F/D, FD) is the main body or main area of the drawing, excluding the title block, rev block, P/L and so on
The list of materials (L/M, LM, LoM), bill of materials (B/M, BM, BoM), or parts list (P/L, PL) is a (usually tabular) list of the materials used to make a part, and/or the parts used to make an assembly. It may contain instructions for heat treatment, finishing, and other processes, for each part number. Sometimes such LoMs or PLs are separate documents from the drawing itself.
Traditional locations for the LoM/BoM are above the title block, or in a separate document.
Some drawings call out dimensions with parameter names (that is, variables, such a "A", "B", "C"), then tabulate rows of parameter values for each part number.
Traditional locations for parameter tables, when such tables are used, are floating near the edges of the field of the drawing, either near the title block or elsewhere along the edges of the field.
Each view or section is a separate set of projections, occupying a contiguous portion of the field of the drawing. Usually views and sections are called out with cross-references to specific zones of the field.
Often a drawing is divided into zones by an alphanumeric grid, with zone labels along the margins, such as A, B, C, D up the sides and 1,2,3,4,5,6 along the top and bottom.[14] Names of zones are thus, for example, A5, D2, or B1. This feature greatly eases discussion of, and reference to, particular areas of the drawing.
As in many technical fields, a wide array of abbreviations and symbols have been developed in engineering drawing during the 20th and 21st centuries. For example, cold rolled steel is often abbreviated as CRS, and diameter is often abbreviated as DIA, D, or ⌀.
Most engineering drawings are language-independent—words are confined to the title block; symbols are used in place of words elsewhere.[15]
With the advent of computer generated drawings for manufacturing and machining, many symbols have fallen out of common use. This poses a problem when attempting to interpret an older hand-drawn document that contains obscure elements that cannot be readily referenced in standard teaching text or control documents such as ASME and ANSI standards. For example, ASME Y14.5M 1994 excludes a few elements that convey critical information as contained in older US Navy drawings and aircraft manufacturing drawings of World War 2 vintage. Researching the intent and meaning of some symbols can prove difficult.
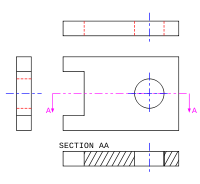
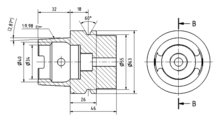
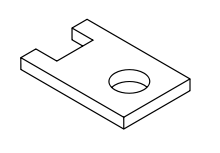
Here is an example of an engineering drawing (an isometric view of the same object is shown above). The different line types are colored for clarity.
Sectional views are indicated by the direction of arrows, as in the example right side.
An engineering drawing is a legal document (that is, a legal instrument), because it communicates all the needed information about "what is wanted" to the people who will expend resources turning the idea into a reality. It is thus a part of a contract; the purchase order and the drawing together, as well as any ancillary documents (engineering change orders [ECOs], called-out specs), constitute the contract. Thus, if the resulting product is wrong, the worker or manufacturer are protected from liability as long as they have faithfully executed the instructions conveyed by the drawing. If those instructions were wrong, it is the fault of the engineer. Because manufacturing and construction are typically very expensive processes (involving large amounts of capital and payroll), the question of liability for errors has legal implications.
For centuries, engineering drawing was the sole method of transferring information from design into manufacture. In recent decades another method has arisen, called model-based definition (MBD) or digital product definition (DPD). In MBD, the information captured by the CAD software app is fed automatically into a CAM app (computer-aided manufacturing), which (with or without postprocessing apps) creates code in other languages such as G-code to be executed by a CNC machine tool (computer numerical control), 3D printer, or (increasingly) a hybrid machine tool that uses both. Thus today it is often the case that the information travels from the mind of the designer into the manufactured component without having ever been codified by an engineering drawing. In MBD, the dataset, not a drawing, is the legal instrument. The term "technical data package" (TDP) is now used to refer to the complete package of information (in one medium or another) that communicates information from design to production (such as 3D-model datasets, engineering drawings, engineering change orders (ECOs), spec revisions and addenda, and so on).
It still takes CAD/CAM programmers, CNC setup workers, and CNC operators to do manufacturing, as well as other people such as quality assurance staff (inspectors) and logistics staff (for materials handling, shipping-and-receiving, and front office functions). These workers often use drawings in the course of their work that have been produced from the MBD dataset. When proper procedures are being followed, a clear chain of precedence is always documented, such that when a person looks at a drawing, s/he is told by a note thereon that this drawing is not the governing instrument (because the MBD dataset is). In these cases, the drawing is still a useful document, although legally it is classified as "for reference only", meaning that if any controversies or discrepancies arise, it is the MBD dataset, not the drawing, that governs.
| National |
|
|---|---|
| Other |
|